Premier RV Roof Repair & Replacement in Austin, TX
RV roof leaks rarely announce themselves clearly. Water enters at one point and travels through the structure before showing up as a stain, a soft wall panel, or a drip somewhere else entirely. Boss Bull provides mobile RV roof repair and replacement across Austin and Central Texas, coming to your location to address the source.
Every repair, no questions asked.
Better Business Bureau accredited.
$500–$25,000. 0–35.9% APR based on creditworthiness.
Austin and Central Texas.
Overview
Over time, UV exposure, weather cycling, and general age cause lap sealant to crack and separate around vents, antennas, and the termination rail. Those gaps are how water gets in. Finding and sealing the actual entry point, not just the visible symptom, is the core of every roof service call we do.
We service EPDM rubber, TPO, fiberglass, and aluminum roofs. Work ranges from resealing failed penetrations and patching damaged membrane sections to full roof replacement when the material has reached the end of its service life. When decking moisture is found during a replacement, we address it before any new membrane goes down.
When full replacement is the right call, we strip the old material, review the decking below for moisture damage, and install new membrane using materials appropriate for the RV and its roof design. We keep the owner informed about what we find before work begins.
For RVs where the owner is planning long-term use, a Crazy Seal roof system installation may be part of the conversation — applied over a newly restored or replaced surface as a durable protective layer. We cover the options so the owner can decide what makes sense for their situation.
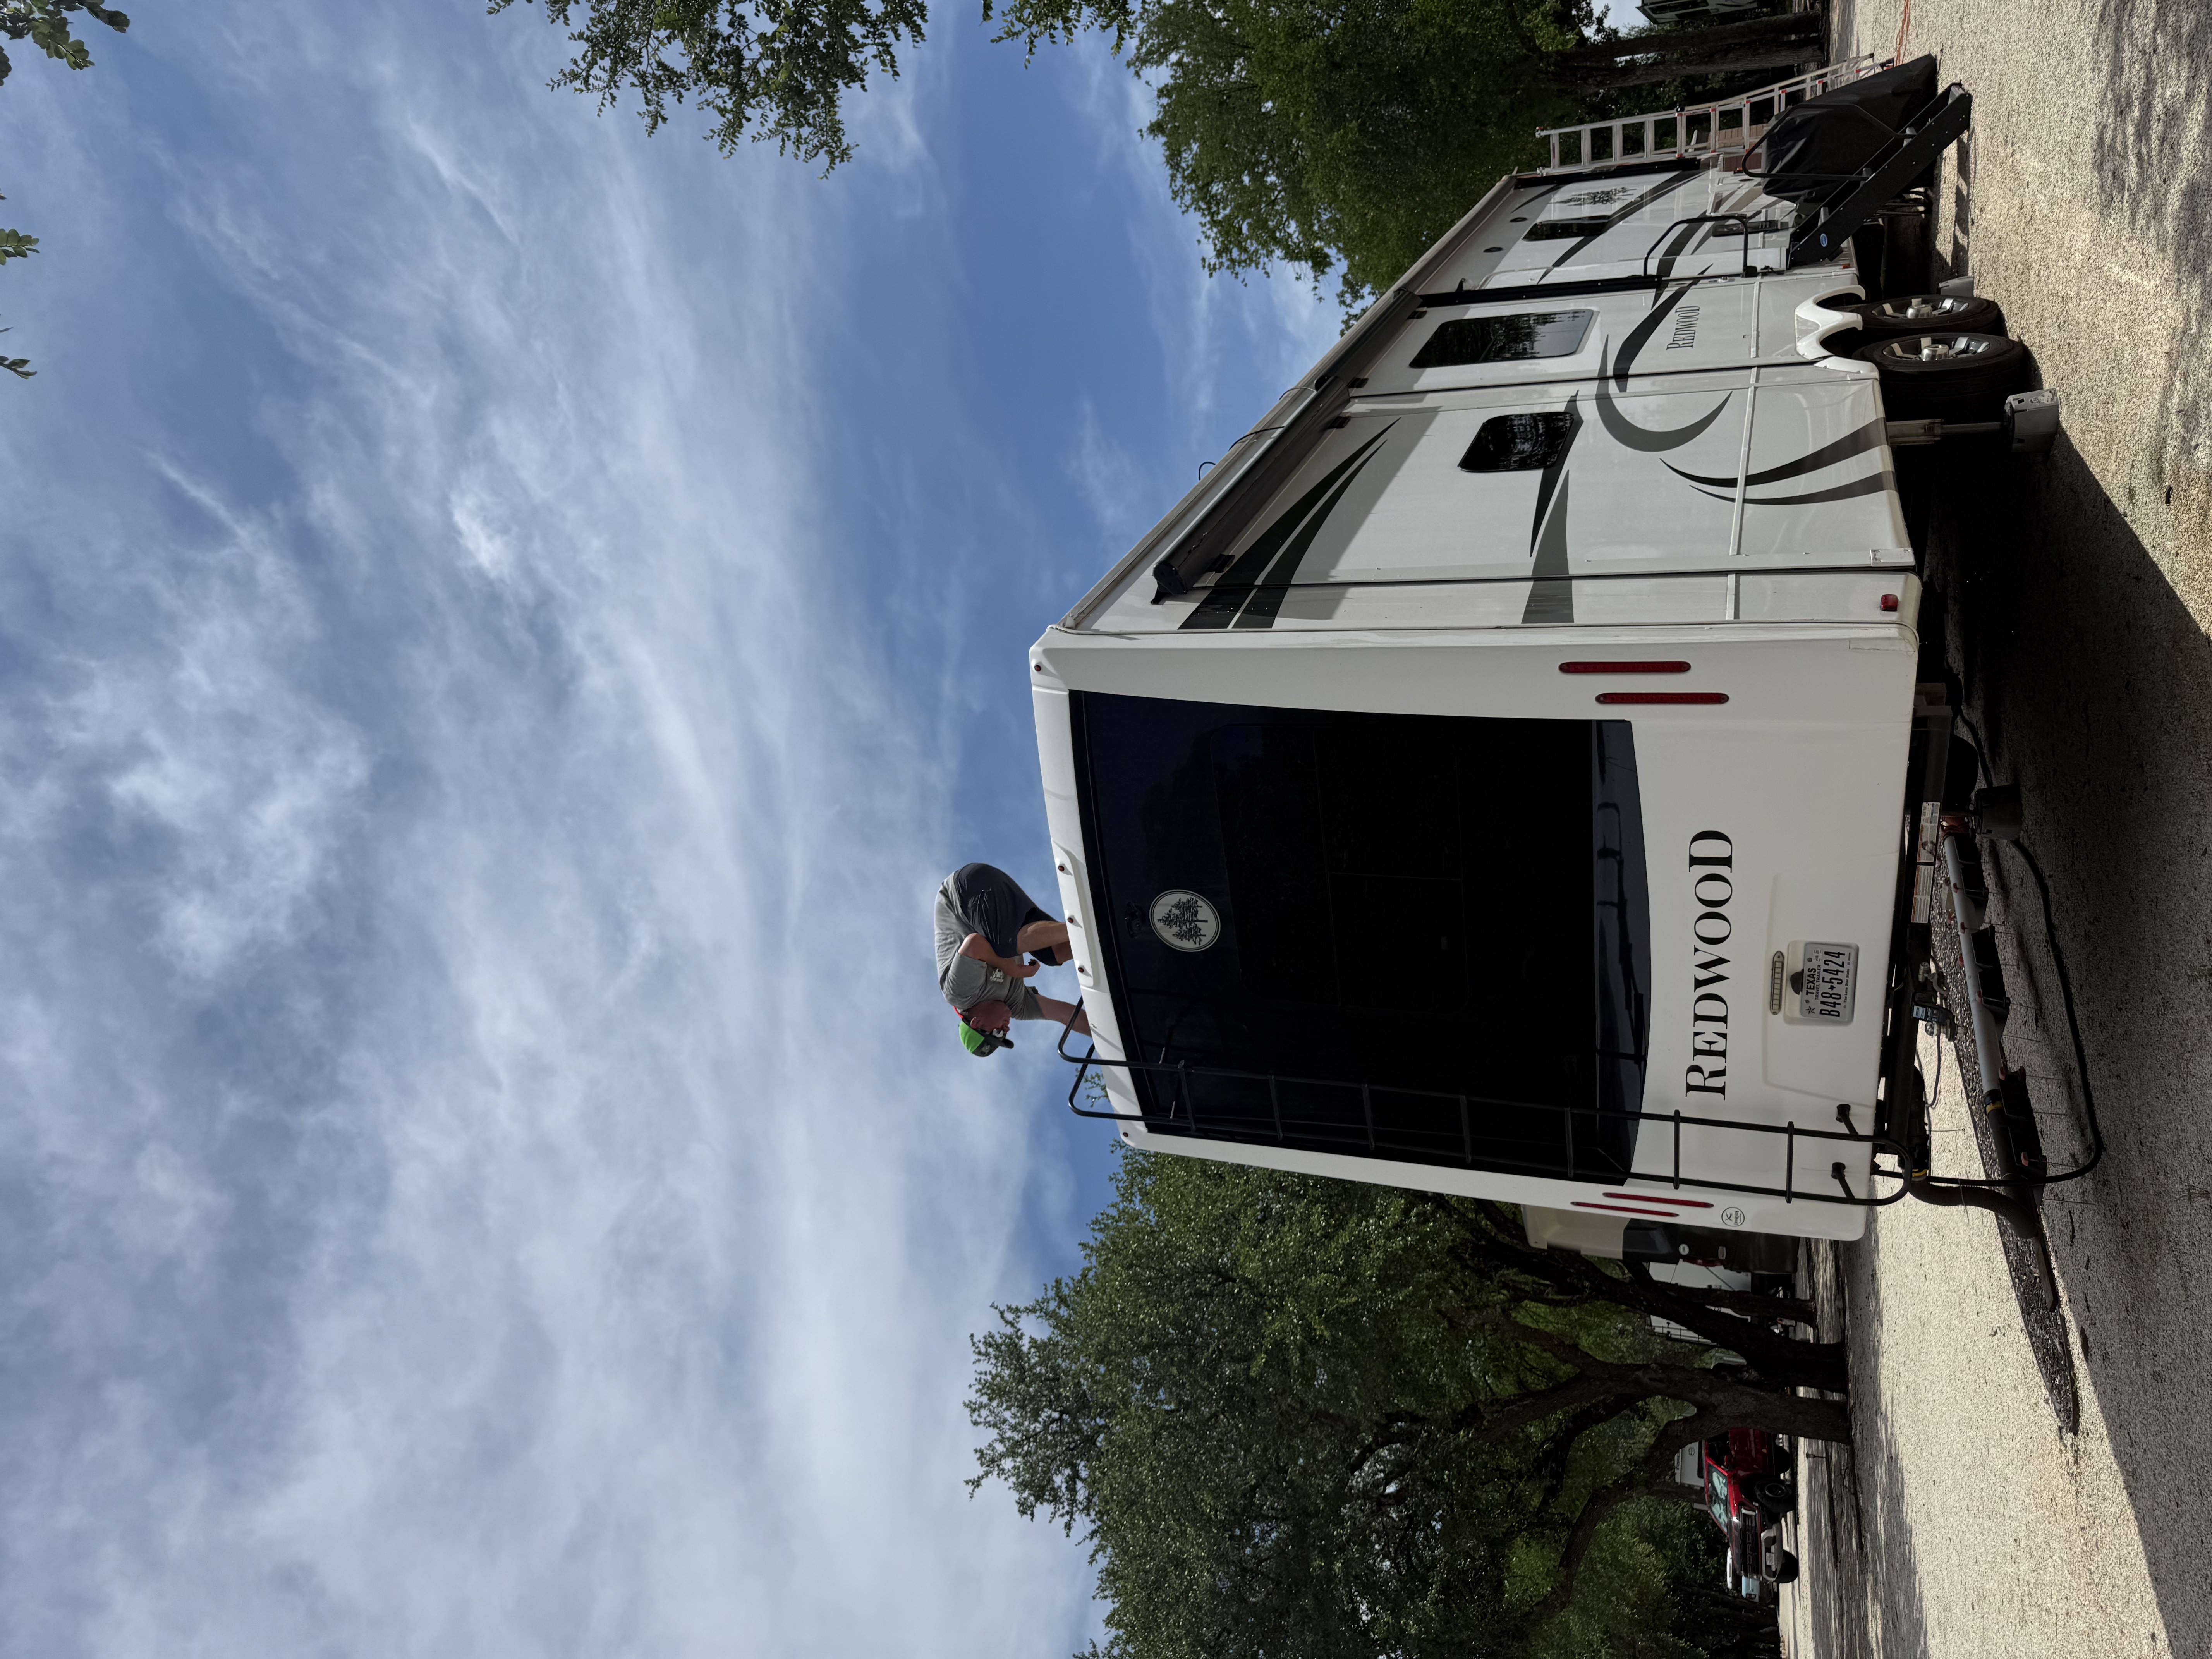
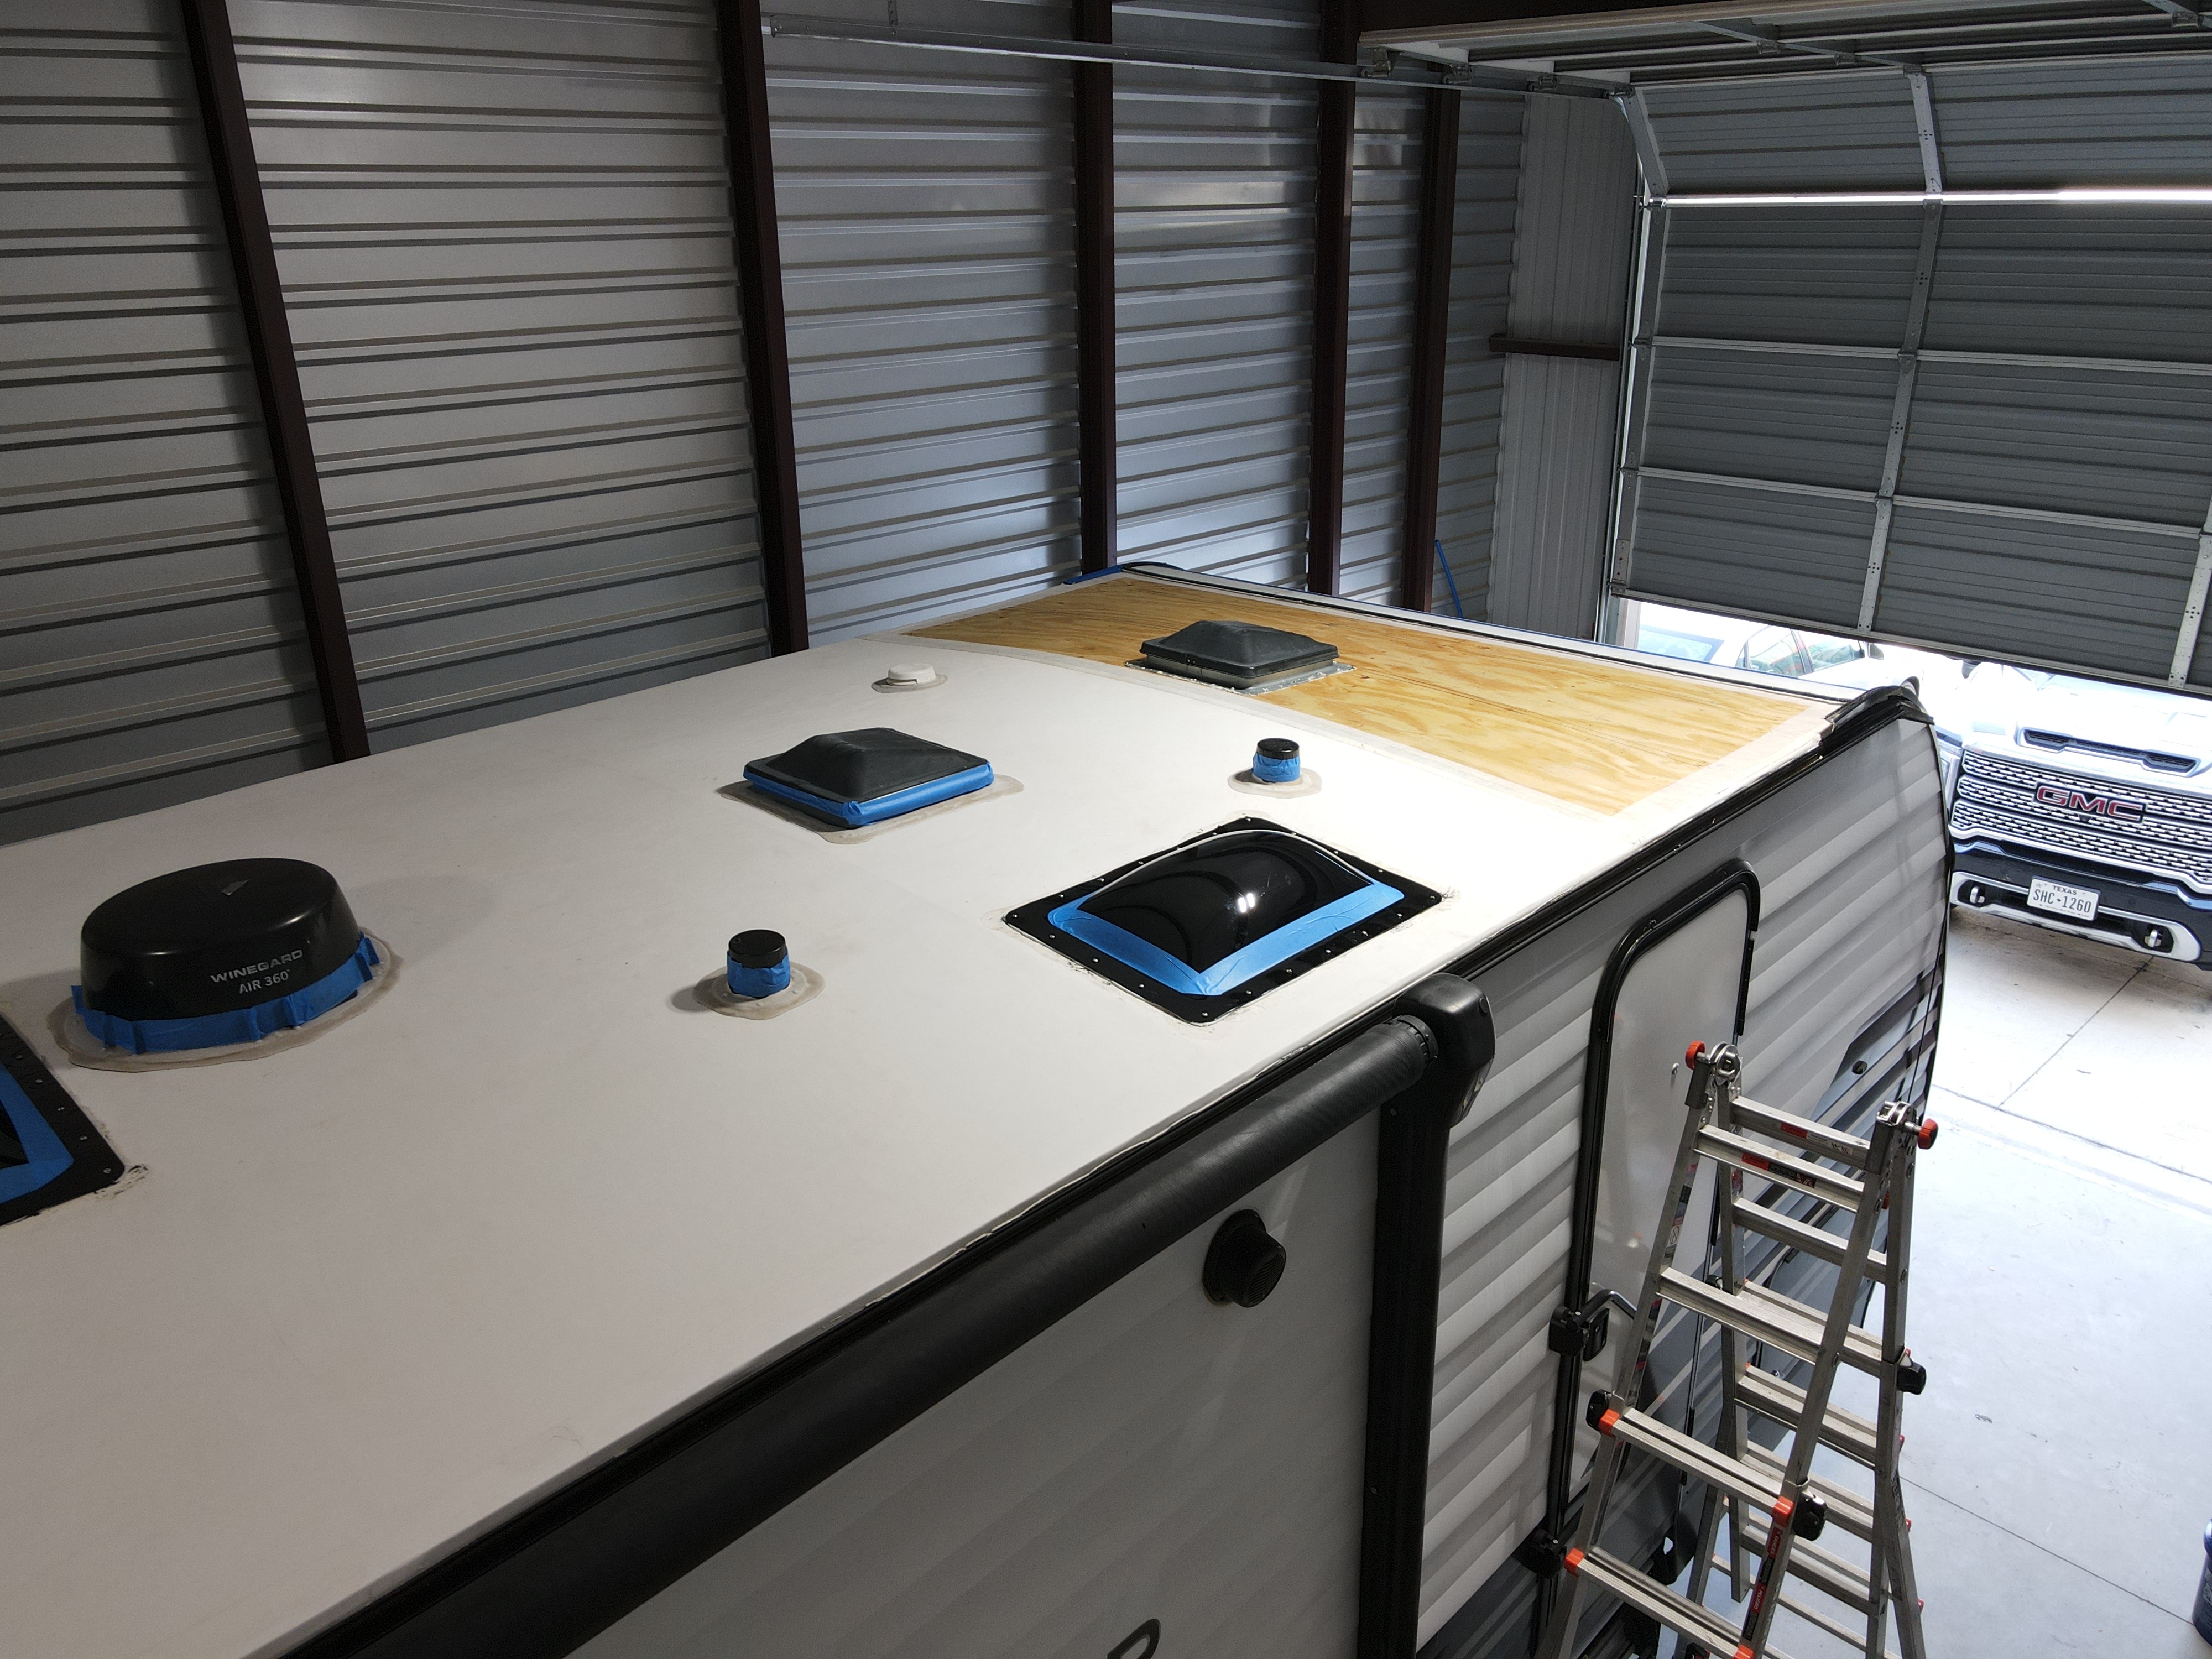
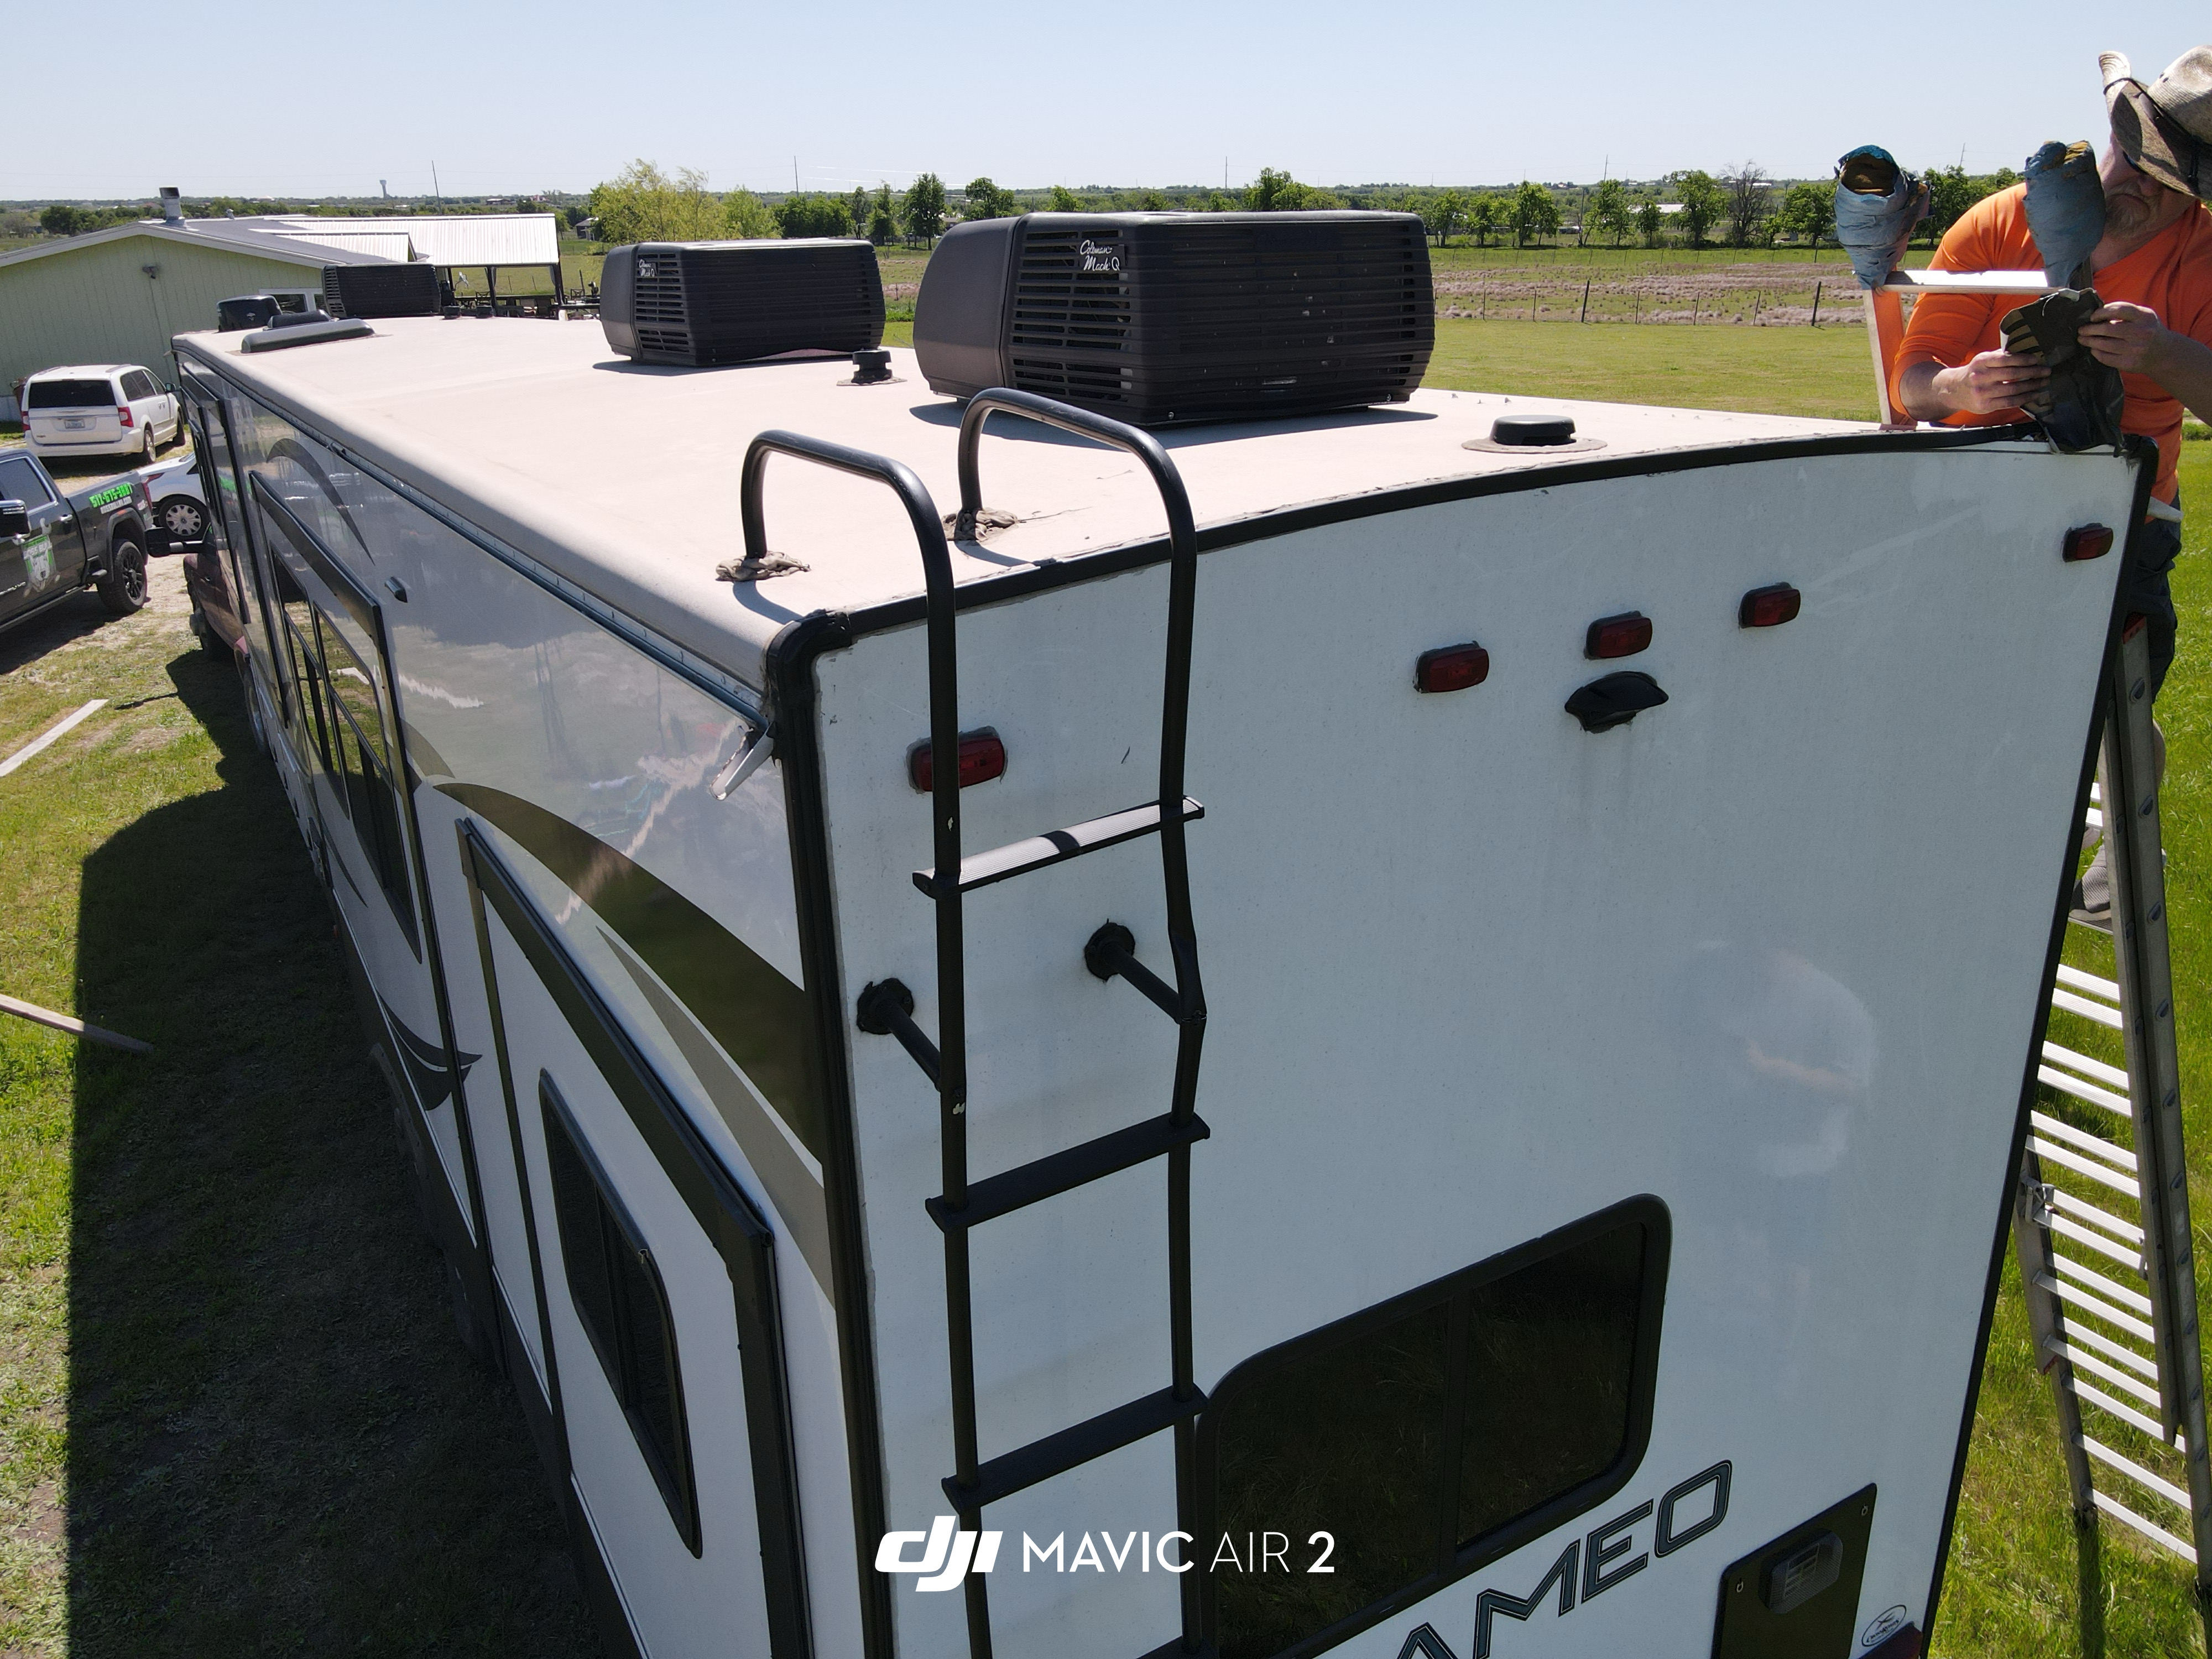
Boss Bull technician on the front cap of a Crossroads Redwood fifth-wheel during an on-site roof service call. Service completed at the owner's location — no towing, no shop drop-off.
The wide establishing shot documents the full scope of the job site setup. Front cap access and main field work both required — two ladders staged for full-length roof coverage.
Common Problems We Fix
- Active roof leaks or interior water stains
- Cracked or lifting seam sealant
- Punctures or membrane tears
- Soft or spongy roof areas
- UV damage and general deterioration
- Damage around vents, AC, or skylights
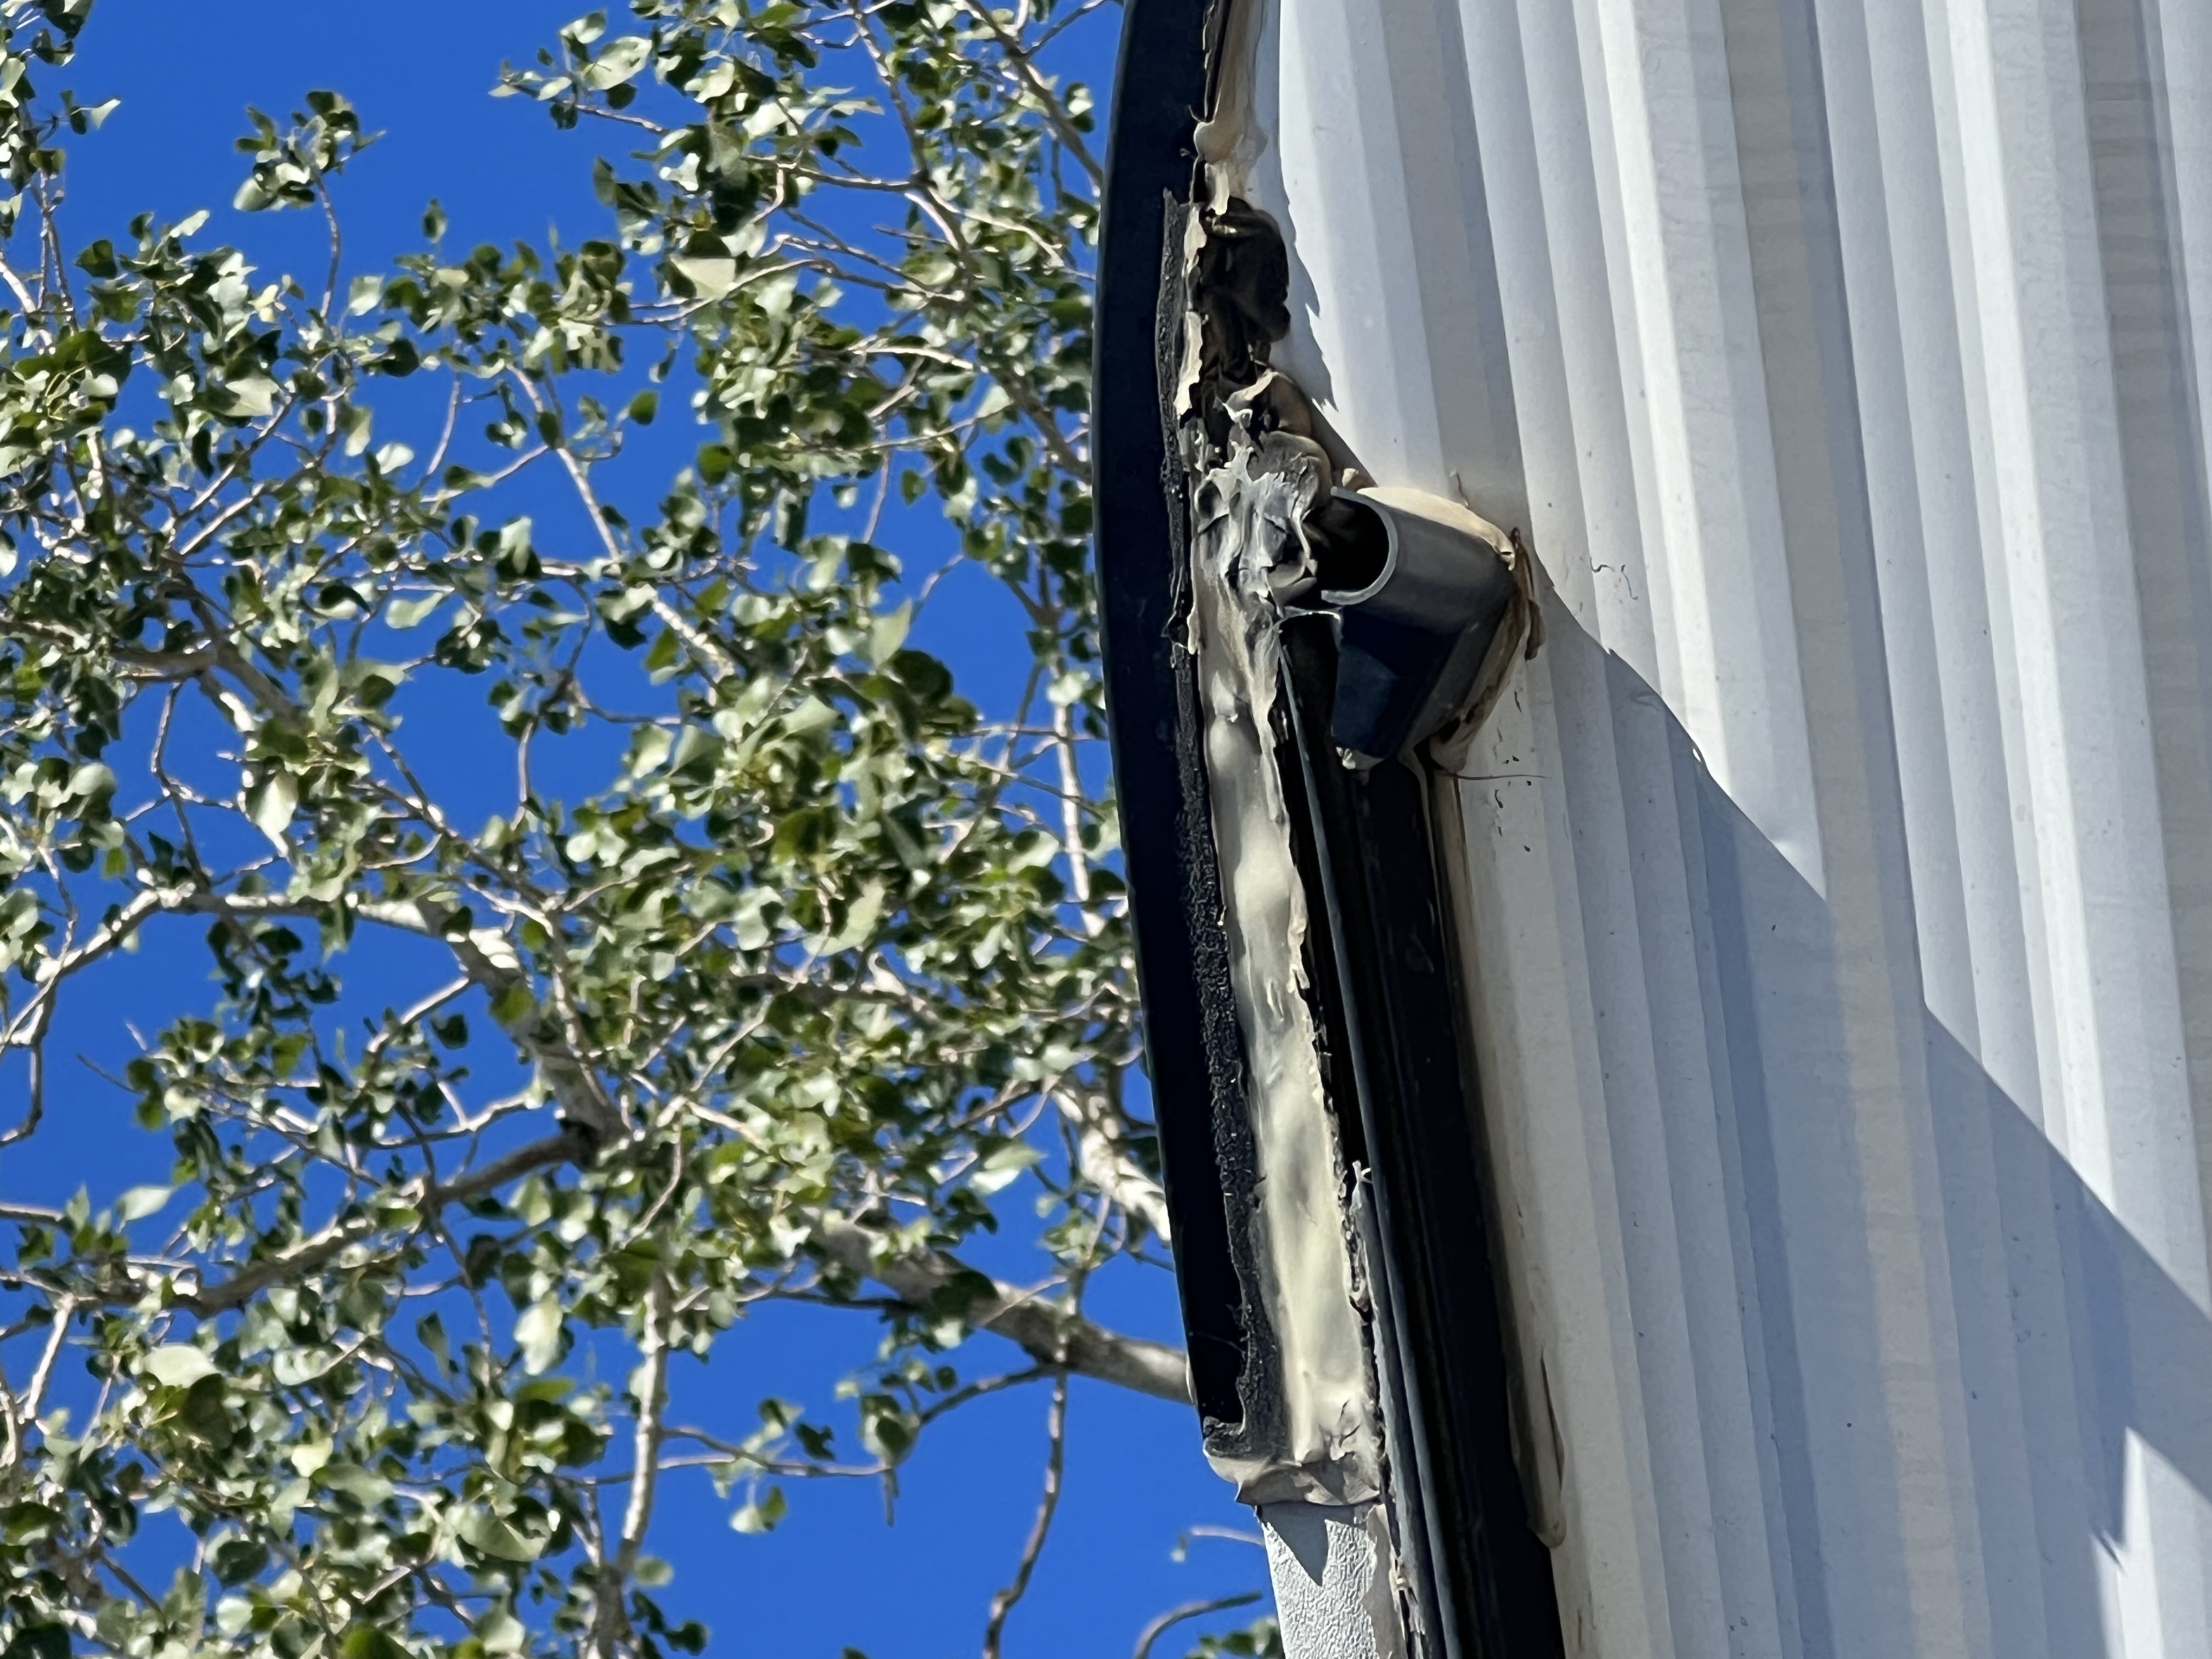
Failed sealant condition at the roof drip edge documented during a service visit. Sealant that has cracked and lifted away from the termination rail is an active water entry path.
The membrane was lifting along the entire drip edge run. This level of sealant failure typically allows water to enter during heavy rain and track well past the visible separation point.
Common Findings During RV Roof Repair & Replacement Service Calls
Roof leaks are not always located directly above the visible water stain. During mobile RV roof repair visits, we frequently find that water has traveled through seams, trim channels, or penetration flanges before showing up inside the RV.
- Lap sealant cracked, lifted, and no longer bonded at vent flanges, skylight frames, and the AC base pad — the most common water entry path on rubber-roof RVs
- Termination rail sealant failed along one full side of the roof — allowing water to enter along the entire affected edge during any rain event
- Membrane punctures or tears at high-flex zones — particularly at slide room seams and front and rear cap transitions where structural movement is greatest
- Roof decking soft spots found after membrane removal — moisture-saturated substrate showing surface delamination or structural softening that was not visible before the membrane came off
- Emergency patch products applied over active leak points — household caulk, roofing cement, and aluminum tape used as a stopgap that later failed and complicated proper repair
- Seam tape lifting at membrane laps — butt-seam tape between membrane sections that has dried and pulled free, leaving a path for water to run under the field membrane
- Hail damage to AC shrouds, vent covers, and the roof membrane surface — requiring damage documentation before repair begins when a claim event is involved
Technician Observations
What Owners Commonly Report
Presenting complaints we hear most often on these service calls.
- Water stains on ceilings or walls
- Soft spots around roof edges or interior trim
- Drips during or after heavy rain
- Bubbling, cracking, or lifting roof sealant visible from the roof surface
- Concerns after storm damage, hail, or tree contact
What We Frequently Find
Actual conditions we document when we arrive on site.
- Lap sealant fully dried, cracked, and pulling away from the membrane at multiple penetrations simultaneously — not just at the visible failure point but across the entire roof field
- Water traveling long distances inside wall cavities and ceiling channels before exiting at an interior stain — the visible drip location and the actual entry point are often several feet apart
- Previous patch layers stacked over prior patch layers — incompatible products applied over multiple attempts at the same penetration, none of which fully stopped water entry
- Full-length membrane delamination at the drip rail — the entire edge of the membrane separated from the aluminum termination rail, making lap sealant repair impractical at this stage
- Water-saturated roof decking found after membrane removal — OSB that appeared dry from the surface was actively absorbing moisture and would have compromised a new membrane installation without being addressed first
Service Recommendations
What we typically advise based on our findings.
- Document visible roof and interior damage before repair begins — photograph water stains, soft spots, and any accessible roof surface before work starts
- Address active water entry before interior damage spreads further into wall framing or cabinetry
- Review all roof penetrations, seams, and termination rail condition during the service visit — single-point failures are often part of a wider pattern
- Use RV-appropriate roof materials rather than household caulk or patch products that are not designed to flex with roof movement
- Provide insurance documentation when damage may be related to a hail, storm, or impact claim event
Why RV Owners Choose Mobile RV Service
- Leaks are addressed before additional water damage reaches the decking and interior — on-site service means the roof is repaired where the RV sits, not after a dealer drop-off wait
- Service at RV parks, campgrounds, storage facilities, and residences across Central Texas
- Roof membrane and sealant materials staged to the service van for same-visit repairs
- Before-and-after documentation completed at each stage for insurance or warranty purposes
- Service across Central Texas including Austin, Georgetown, Round Rock, Cedar Park, Kyle, Buda, and surrounding areas
- Financing available through Wisetack for roof replacement and restoration projects
Roof Systems We Commonly Service
- EPDM rubber membrane roofs
- TPO membrane roofs
- Fiberglass roof panels (front cap, rear cap, full fiberglass)
- Aluminum roof substrates
- Roof decking (OSB and plywood) when replacement is needed
- All roof penetrations: AC base pads, vent covers, skylights, antennas, exhaust vents
- Lap sealant and seam tape systems
- Crazy Seal roof system installation (roof restoration and protection)
Roof Replacement Options
Not every roof situation calls for the same solution. The right path depends on the membrane condition, decking integrity, water intrusion history, and the owner's plans for the RV.
Targeted Repair
Sealant repair, seam tape work, and penetration re-sealing when the membrane is still in serviceable condition and failures are isolated to specific points.
Full Membrane Replacement
When the field membrane has failed, delaminated, or been compromised by decking moisture. Includes substrate review and decking replacement when needed before new membrane is installed.
Crazy Seal Roof System
A long-term protective coating system applied over a structurally sound surface — following a repair or membrane restoration on an RV the owner plans to keep in service.
Learn more →Before & After
Before Repair
Pre-repair roof condition documented during an outdoor service visit. The oxidized membrane field, cracked dome vent base, and failing sealant around the skylight penetrations are all visible before any work begins.
Both the dome vent and the skylight penetration showed sealant that had hardened and separated. The oxidized membrane field indicated the existing coat system was at or past its effective service life — this roof was a candidate for a full Crazy Seal installation.
Completed Repair
Completed roof restoration on a Crossroads Cameo fifth-wheel. White elastomeric coat fully applied, all penetrations reinstalled and sealed, surface uniform and ready.
The completed coat was documented after all penetrations were reinstalled and the blue masking tape removed. Bright white surface confirms full field coverage and clean penetration seals.
Completed roof restoration on a Crossroads Cameo fifth-wheel. The full elastomeric coat is applied, all penetrations are reinstalled and sealed, and the surface is uniform and ready.
The completed coat was documented after all penetrations were reinstalled and the blue masking tape removed. The bright white surface confirms full coverage across every penetration and the entire field area.
More From This Service
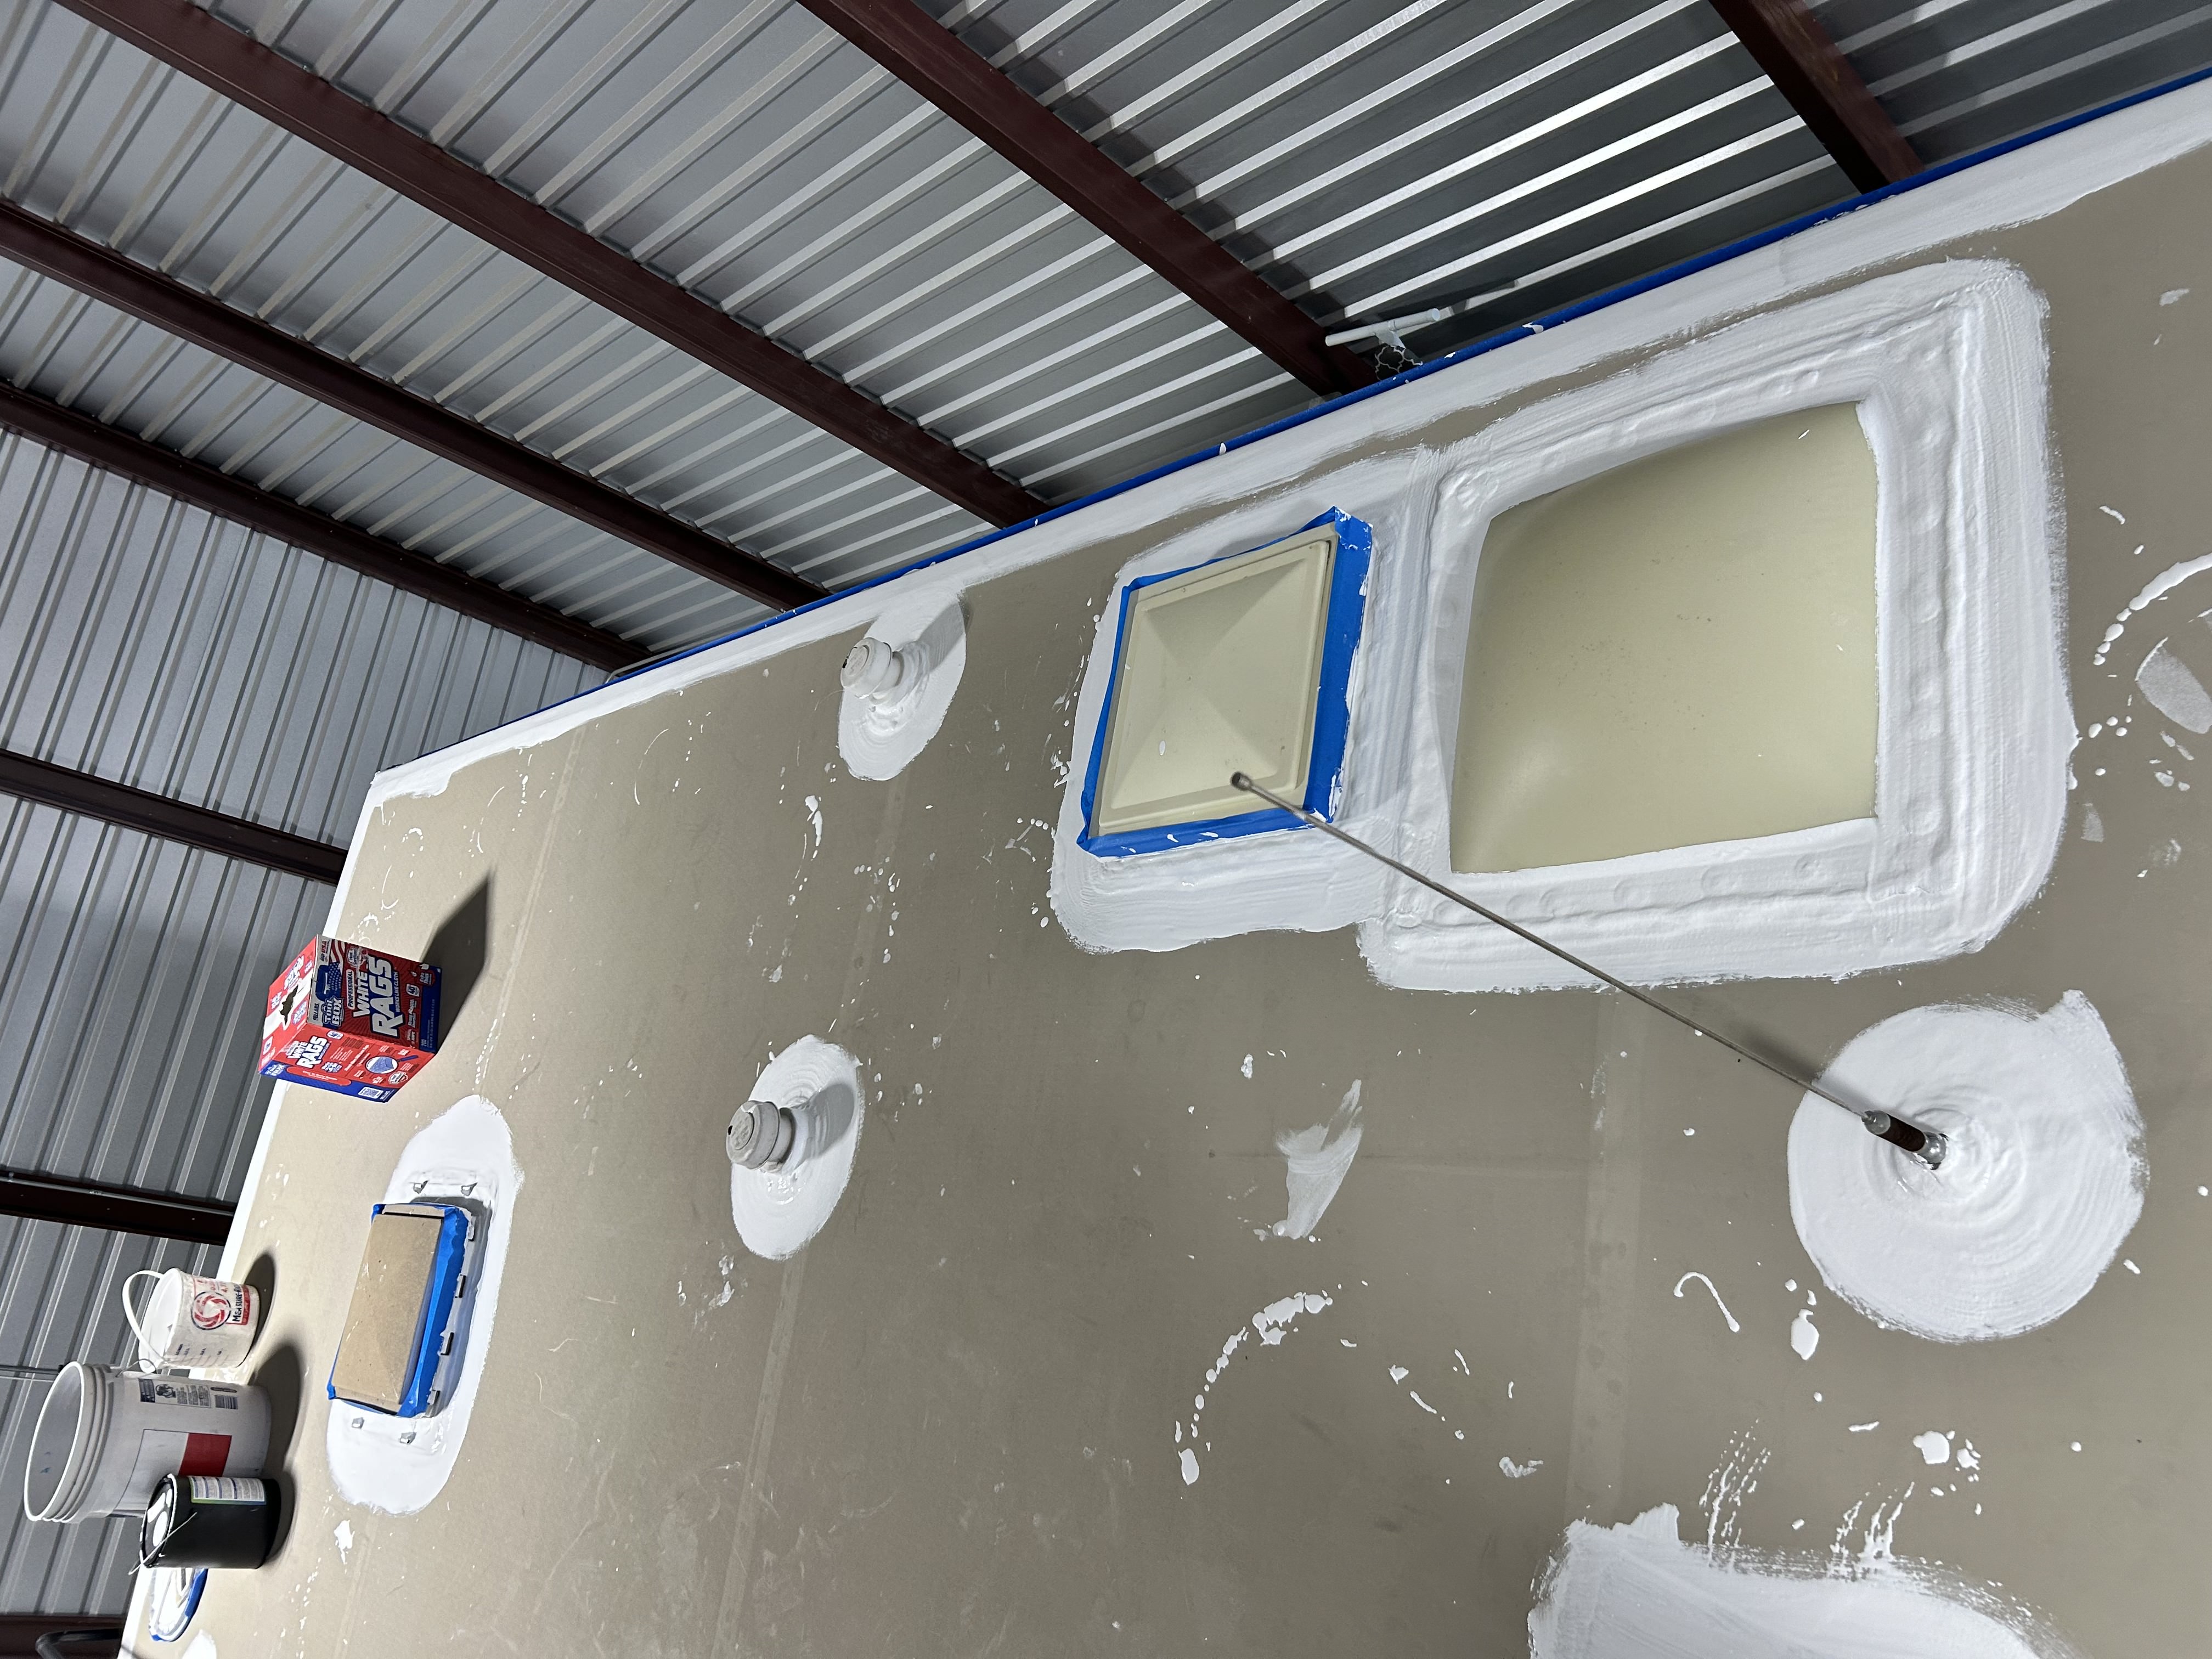
Seam sealing and penetration treatment in progress during a roof restoration. Skylights and vents are masked with blue tape and each opening receives a full sealant ring before the field coat is rolled.
All penetrations were masked before sealing began. White lap sealant was applied around each skylight frame, vent flange, and seam before the blue tape was removed and the field coat continued.
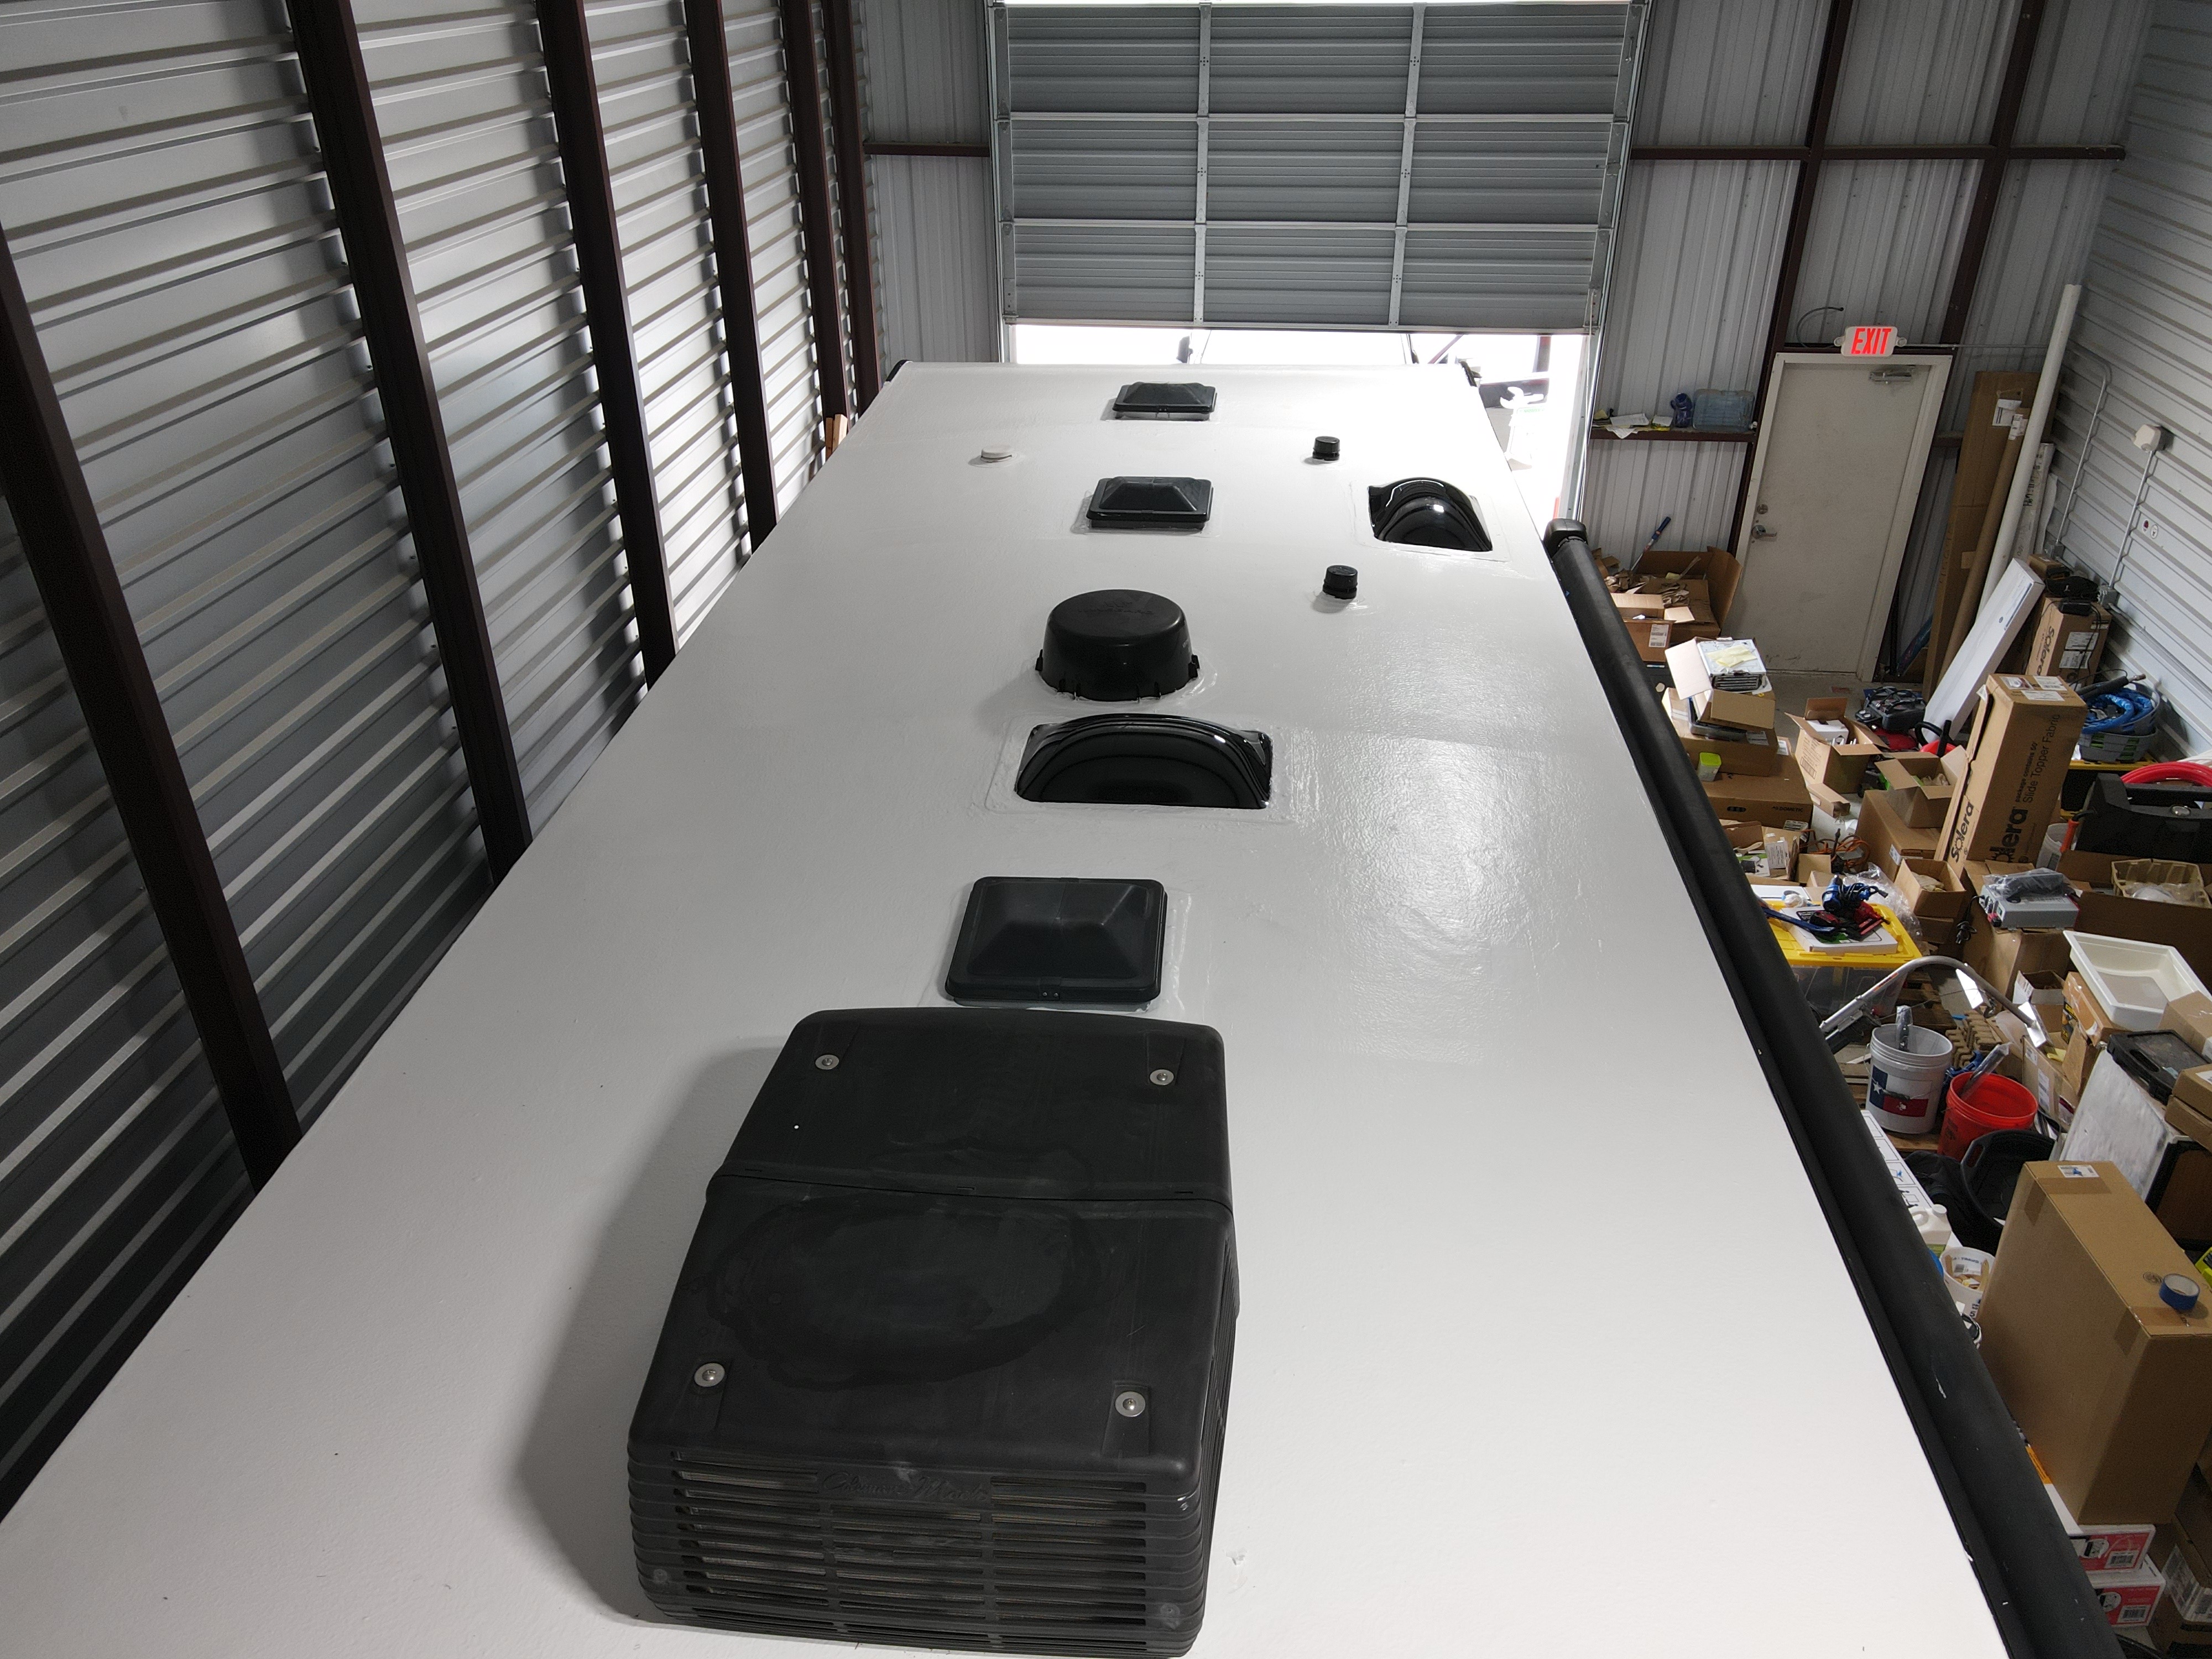
Mid-stage roof restoration on a Coachmen Freelander. Approximately 80 percent of the field is coated white at this stage, with the remaining area progressing toward full coverage.
The wide-angle shot captures the full length of the roof surface and shows the coat uniformity as the restoration progressed from one end toward the other.
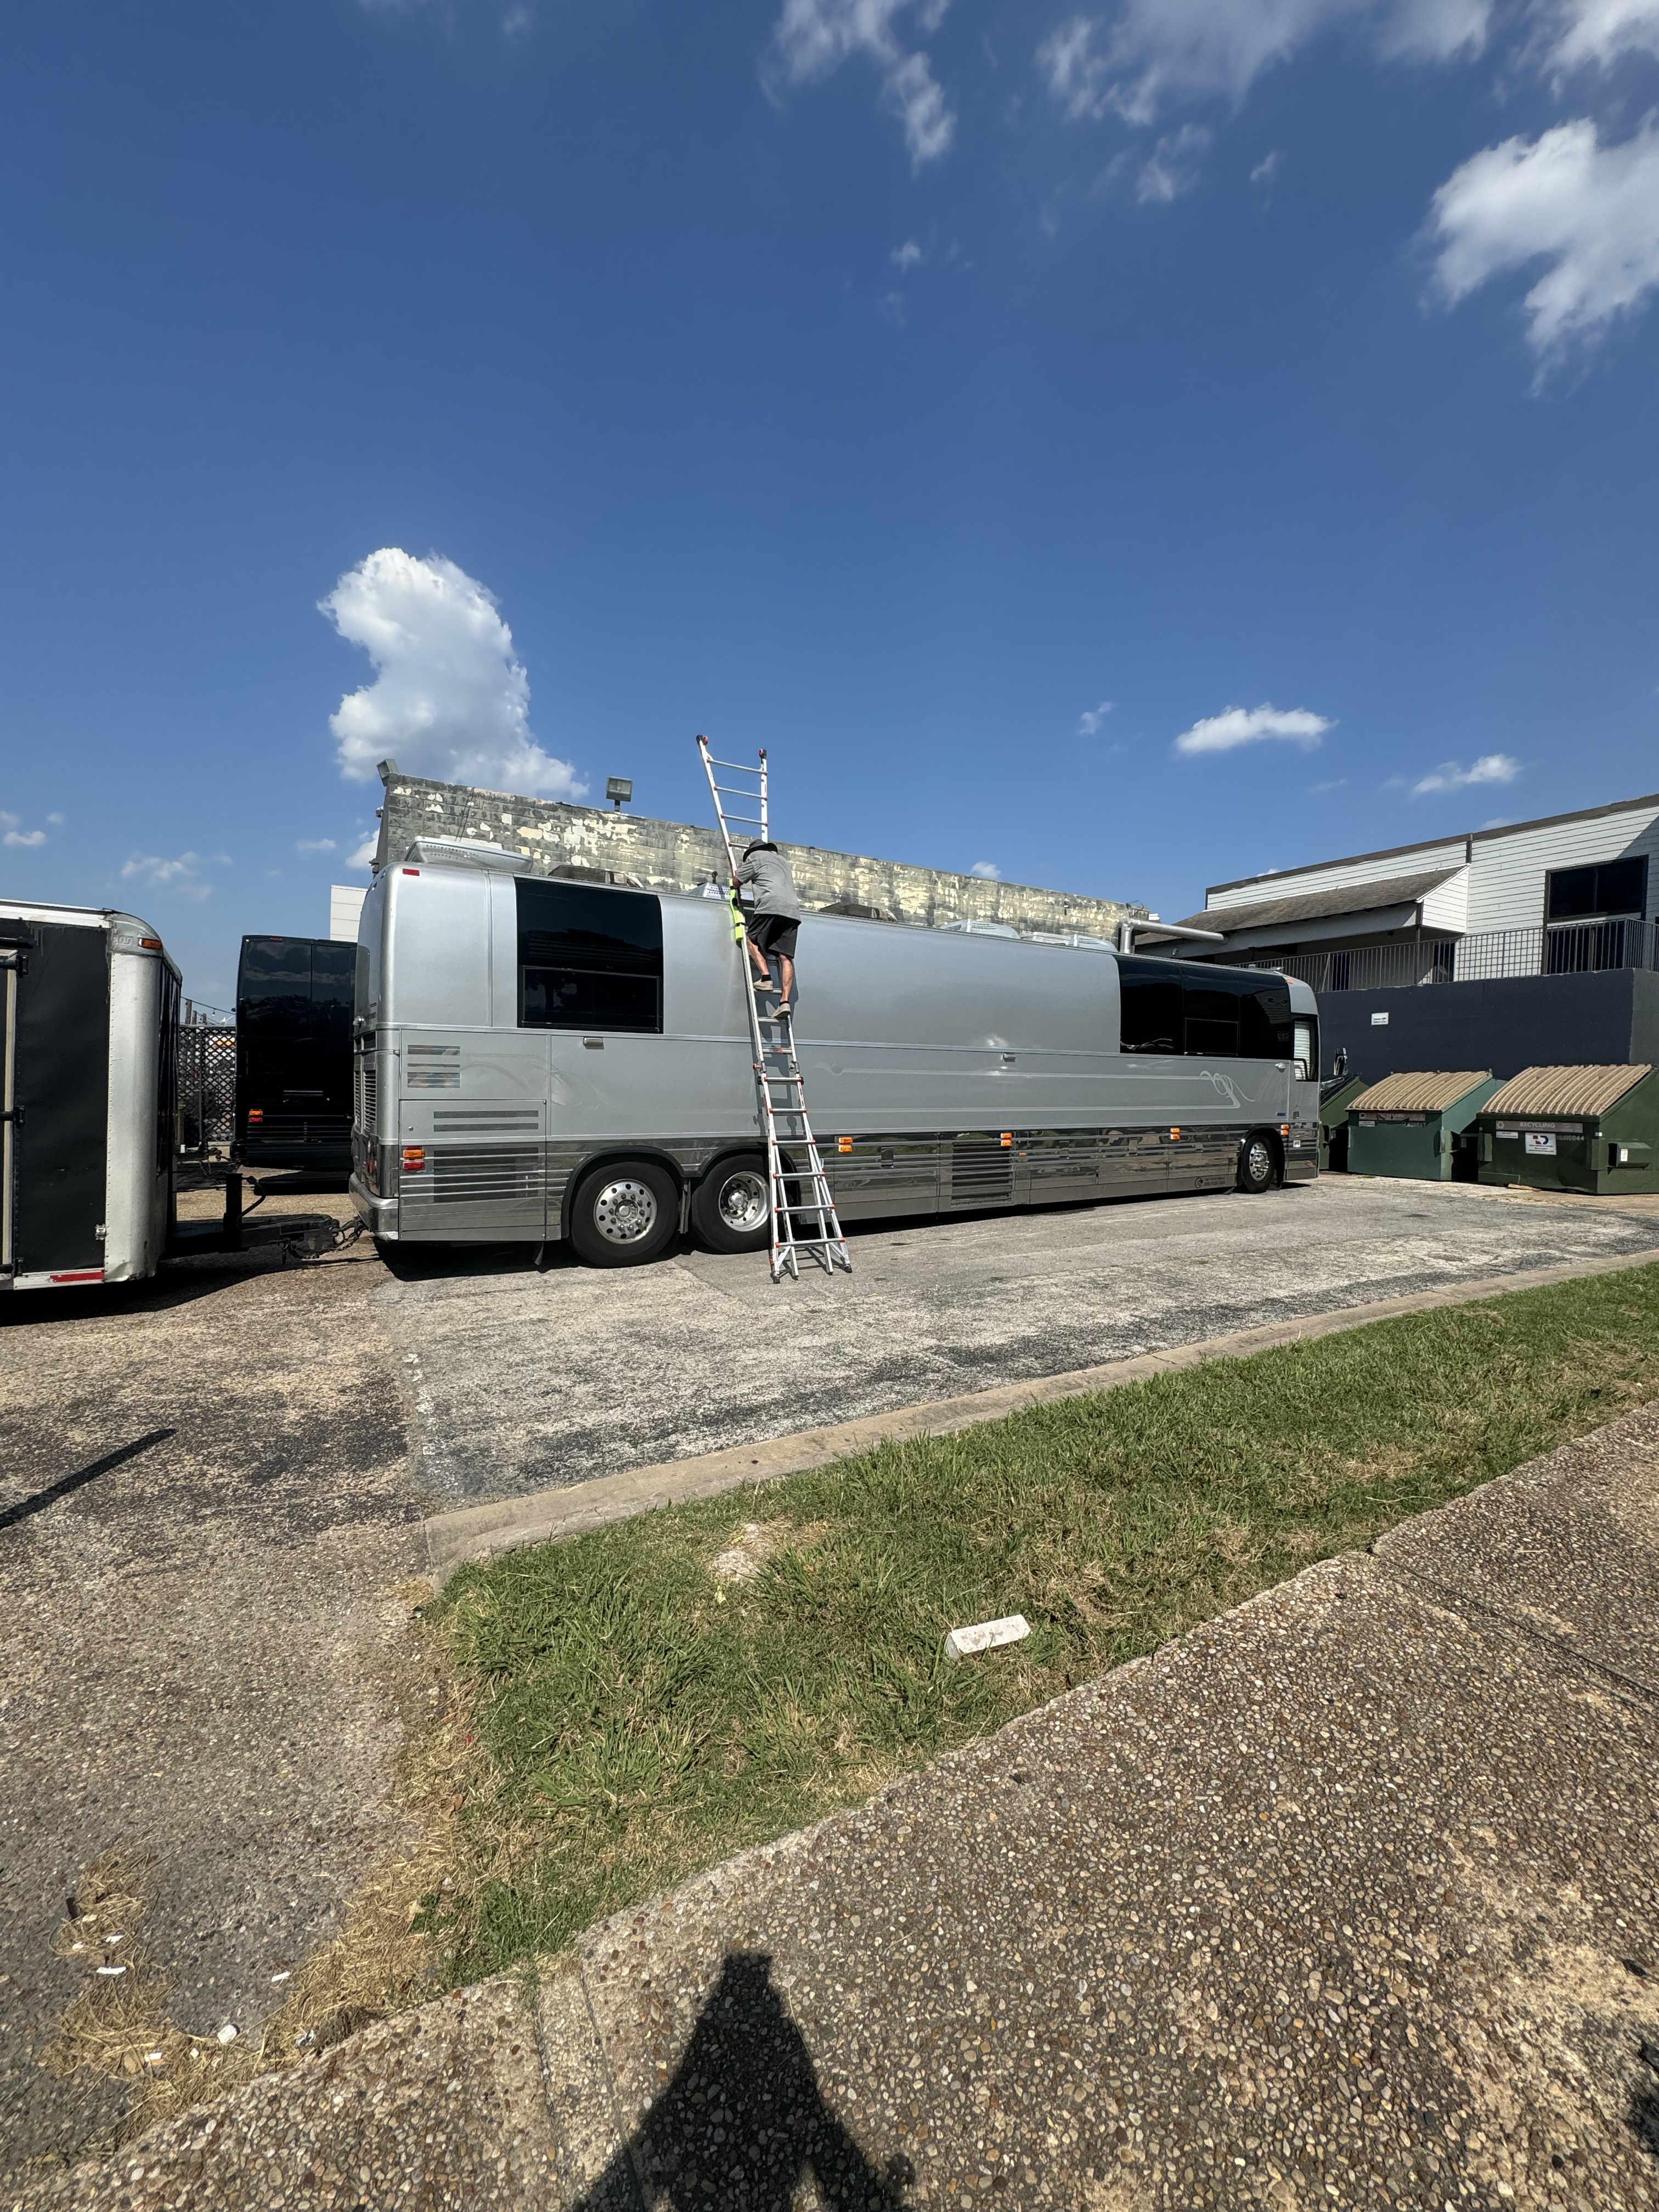
Rooftop access on a full-length entertainer coach during a mobile service visit. Boss Bull brings the ladder and equipment needed to inspect and service roof systems on oversized coaches at their location.
The wide shot captures the full scale of the coach and the ladder setup required to access the rooftop. Rooftop inspection and any required service work were completed on site without moving the coach.
Full roof replacement in progress. New plywood decking is visible in the rear section where the new membrane has not yet been laid. The forward portion of the roof is already covered with fresh membrane.
The membrane installation was documented at this mid-stage to show the transition between completed substrate work and the remaining open section. All penetrations were removed, the substrate was replaced or inspected, and reinstallation of vents and the AC unit began as the membrane advanced.
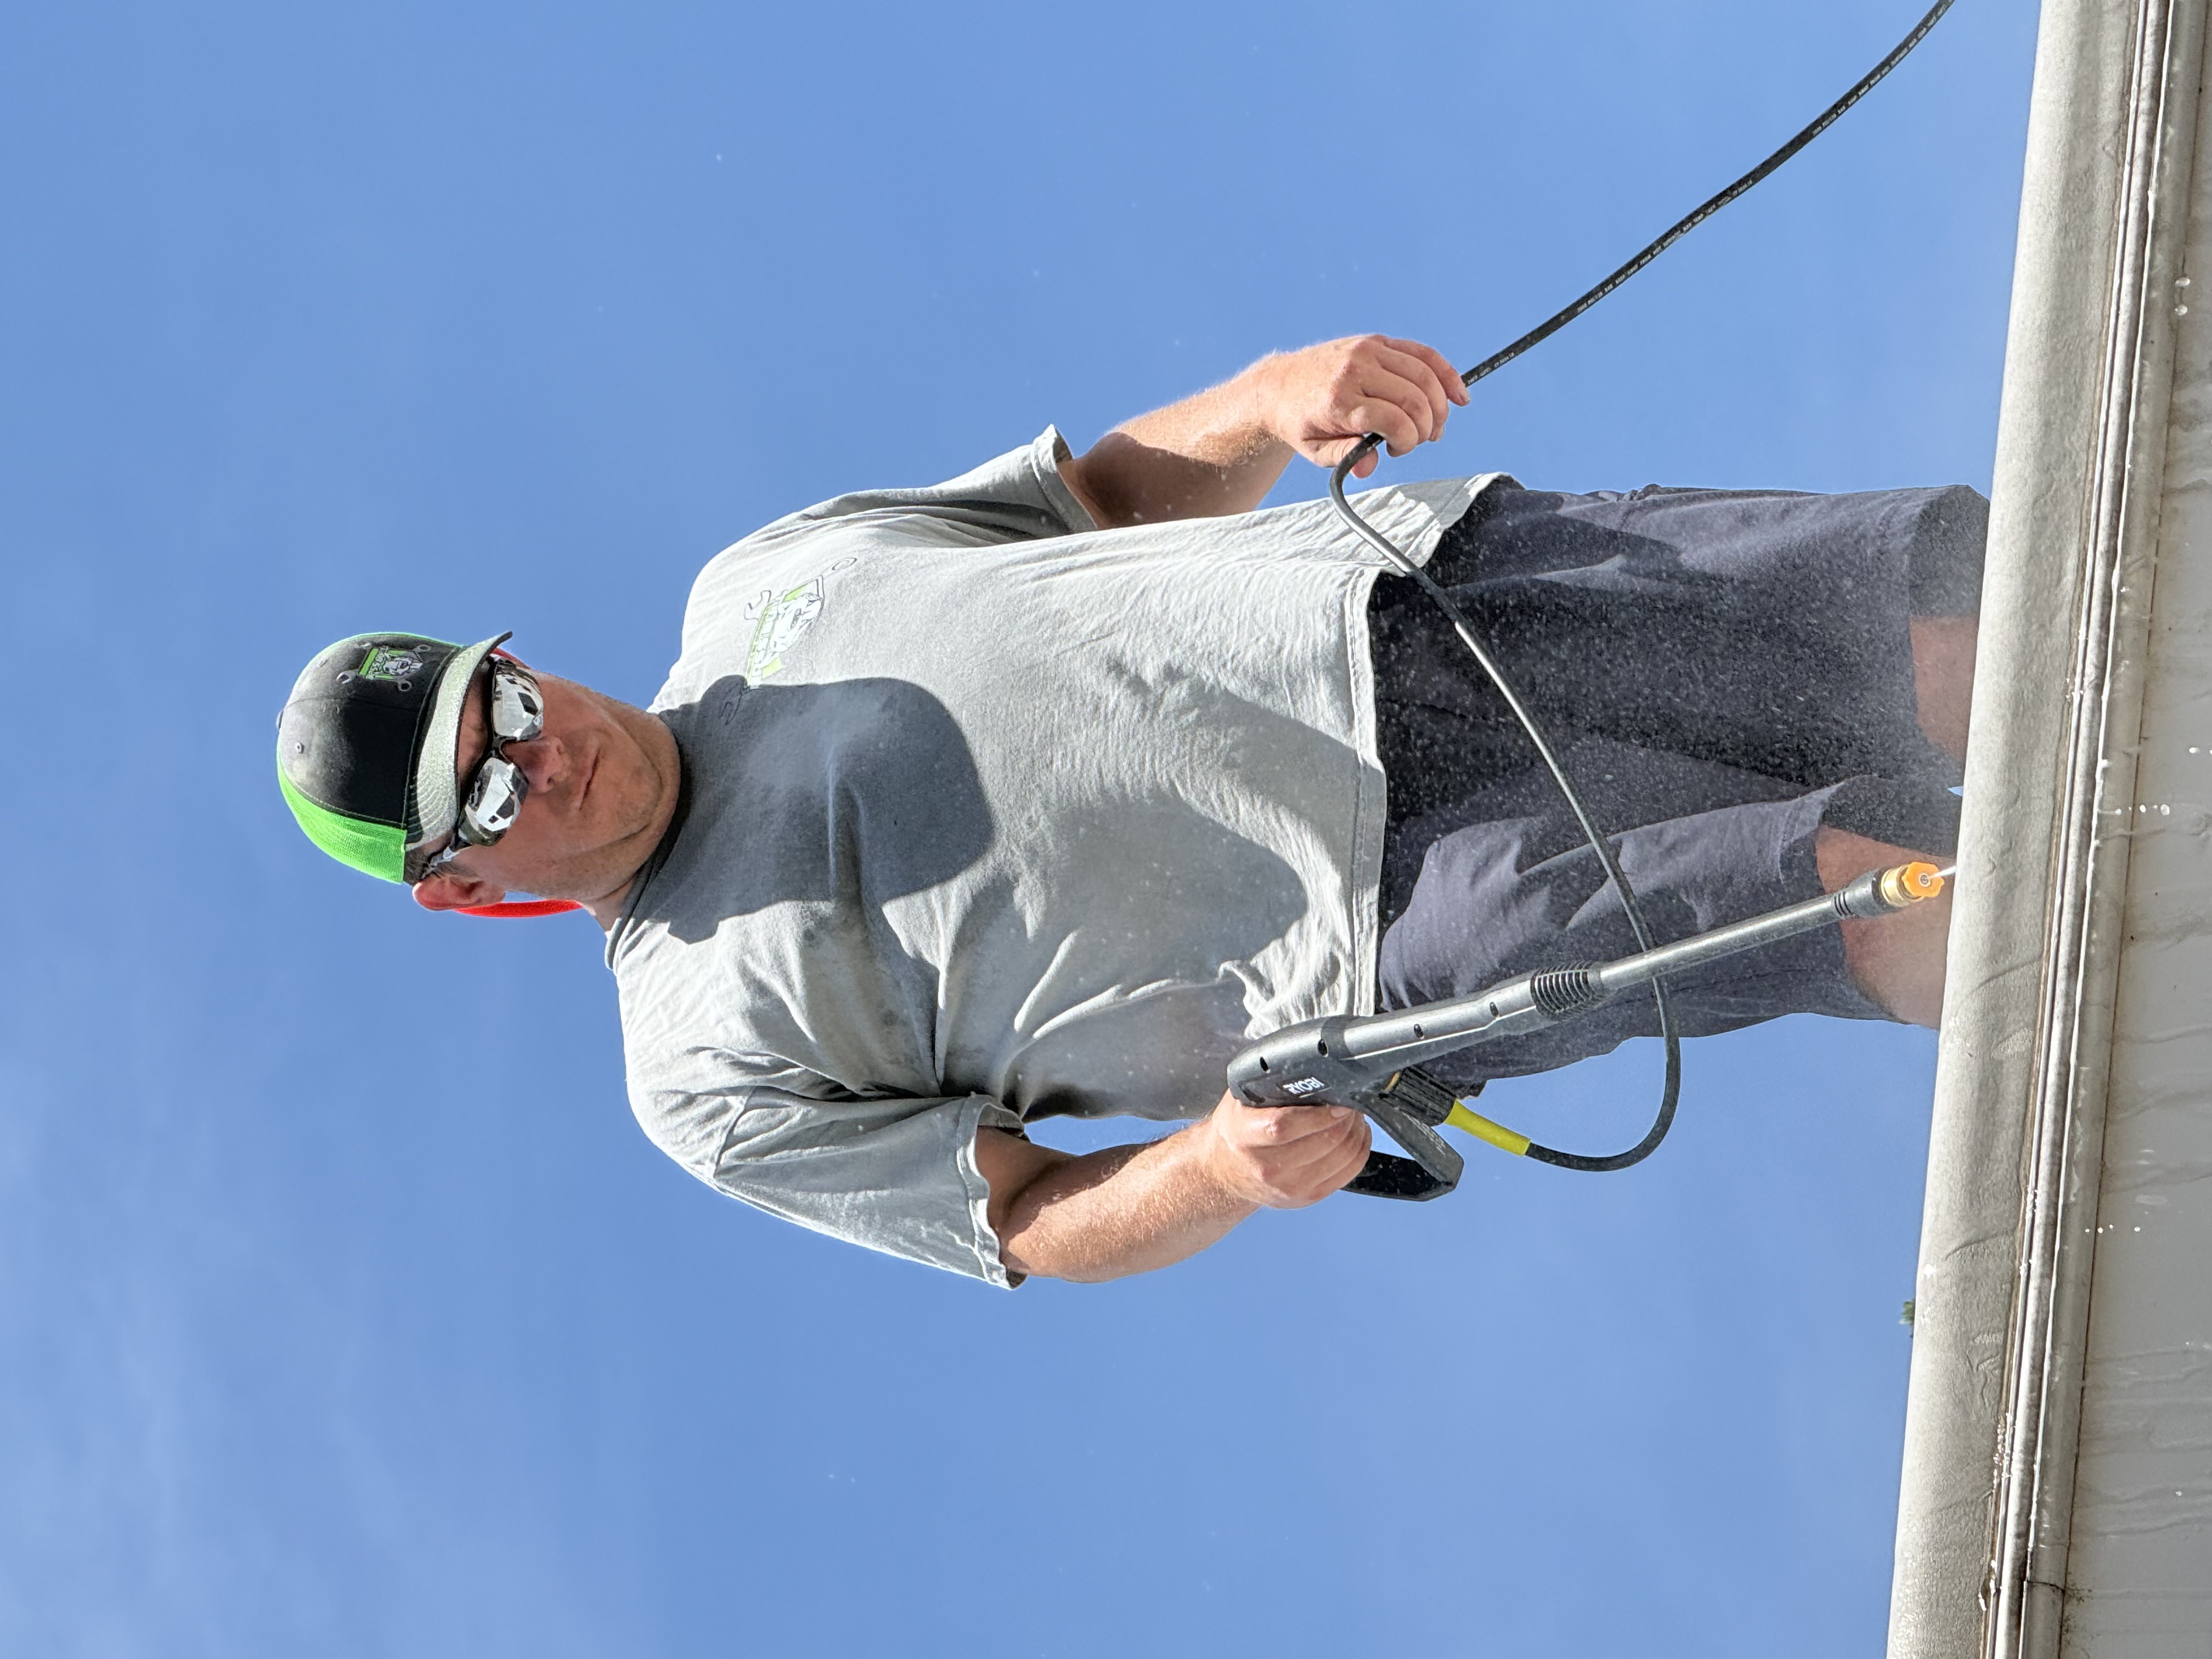
Roof surface cleaned by pressure washing before any coating material is applied. Surface prep is one of the most important stages of a successful roof restoration — coating applied to a contaminated or wet surface will not bond correctly.
Pressure washing removes oxidation, debris, and previous product residue before the surface is allowed to fully dry. The prep stage takes as long as it needs to — rushing it compromises the adhesion of whatever goes down after.
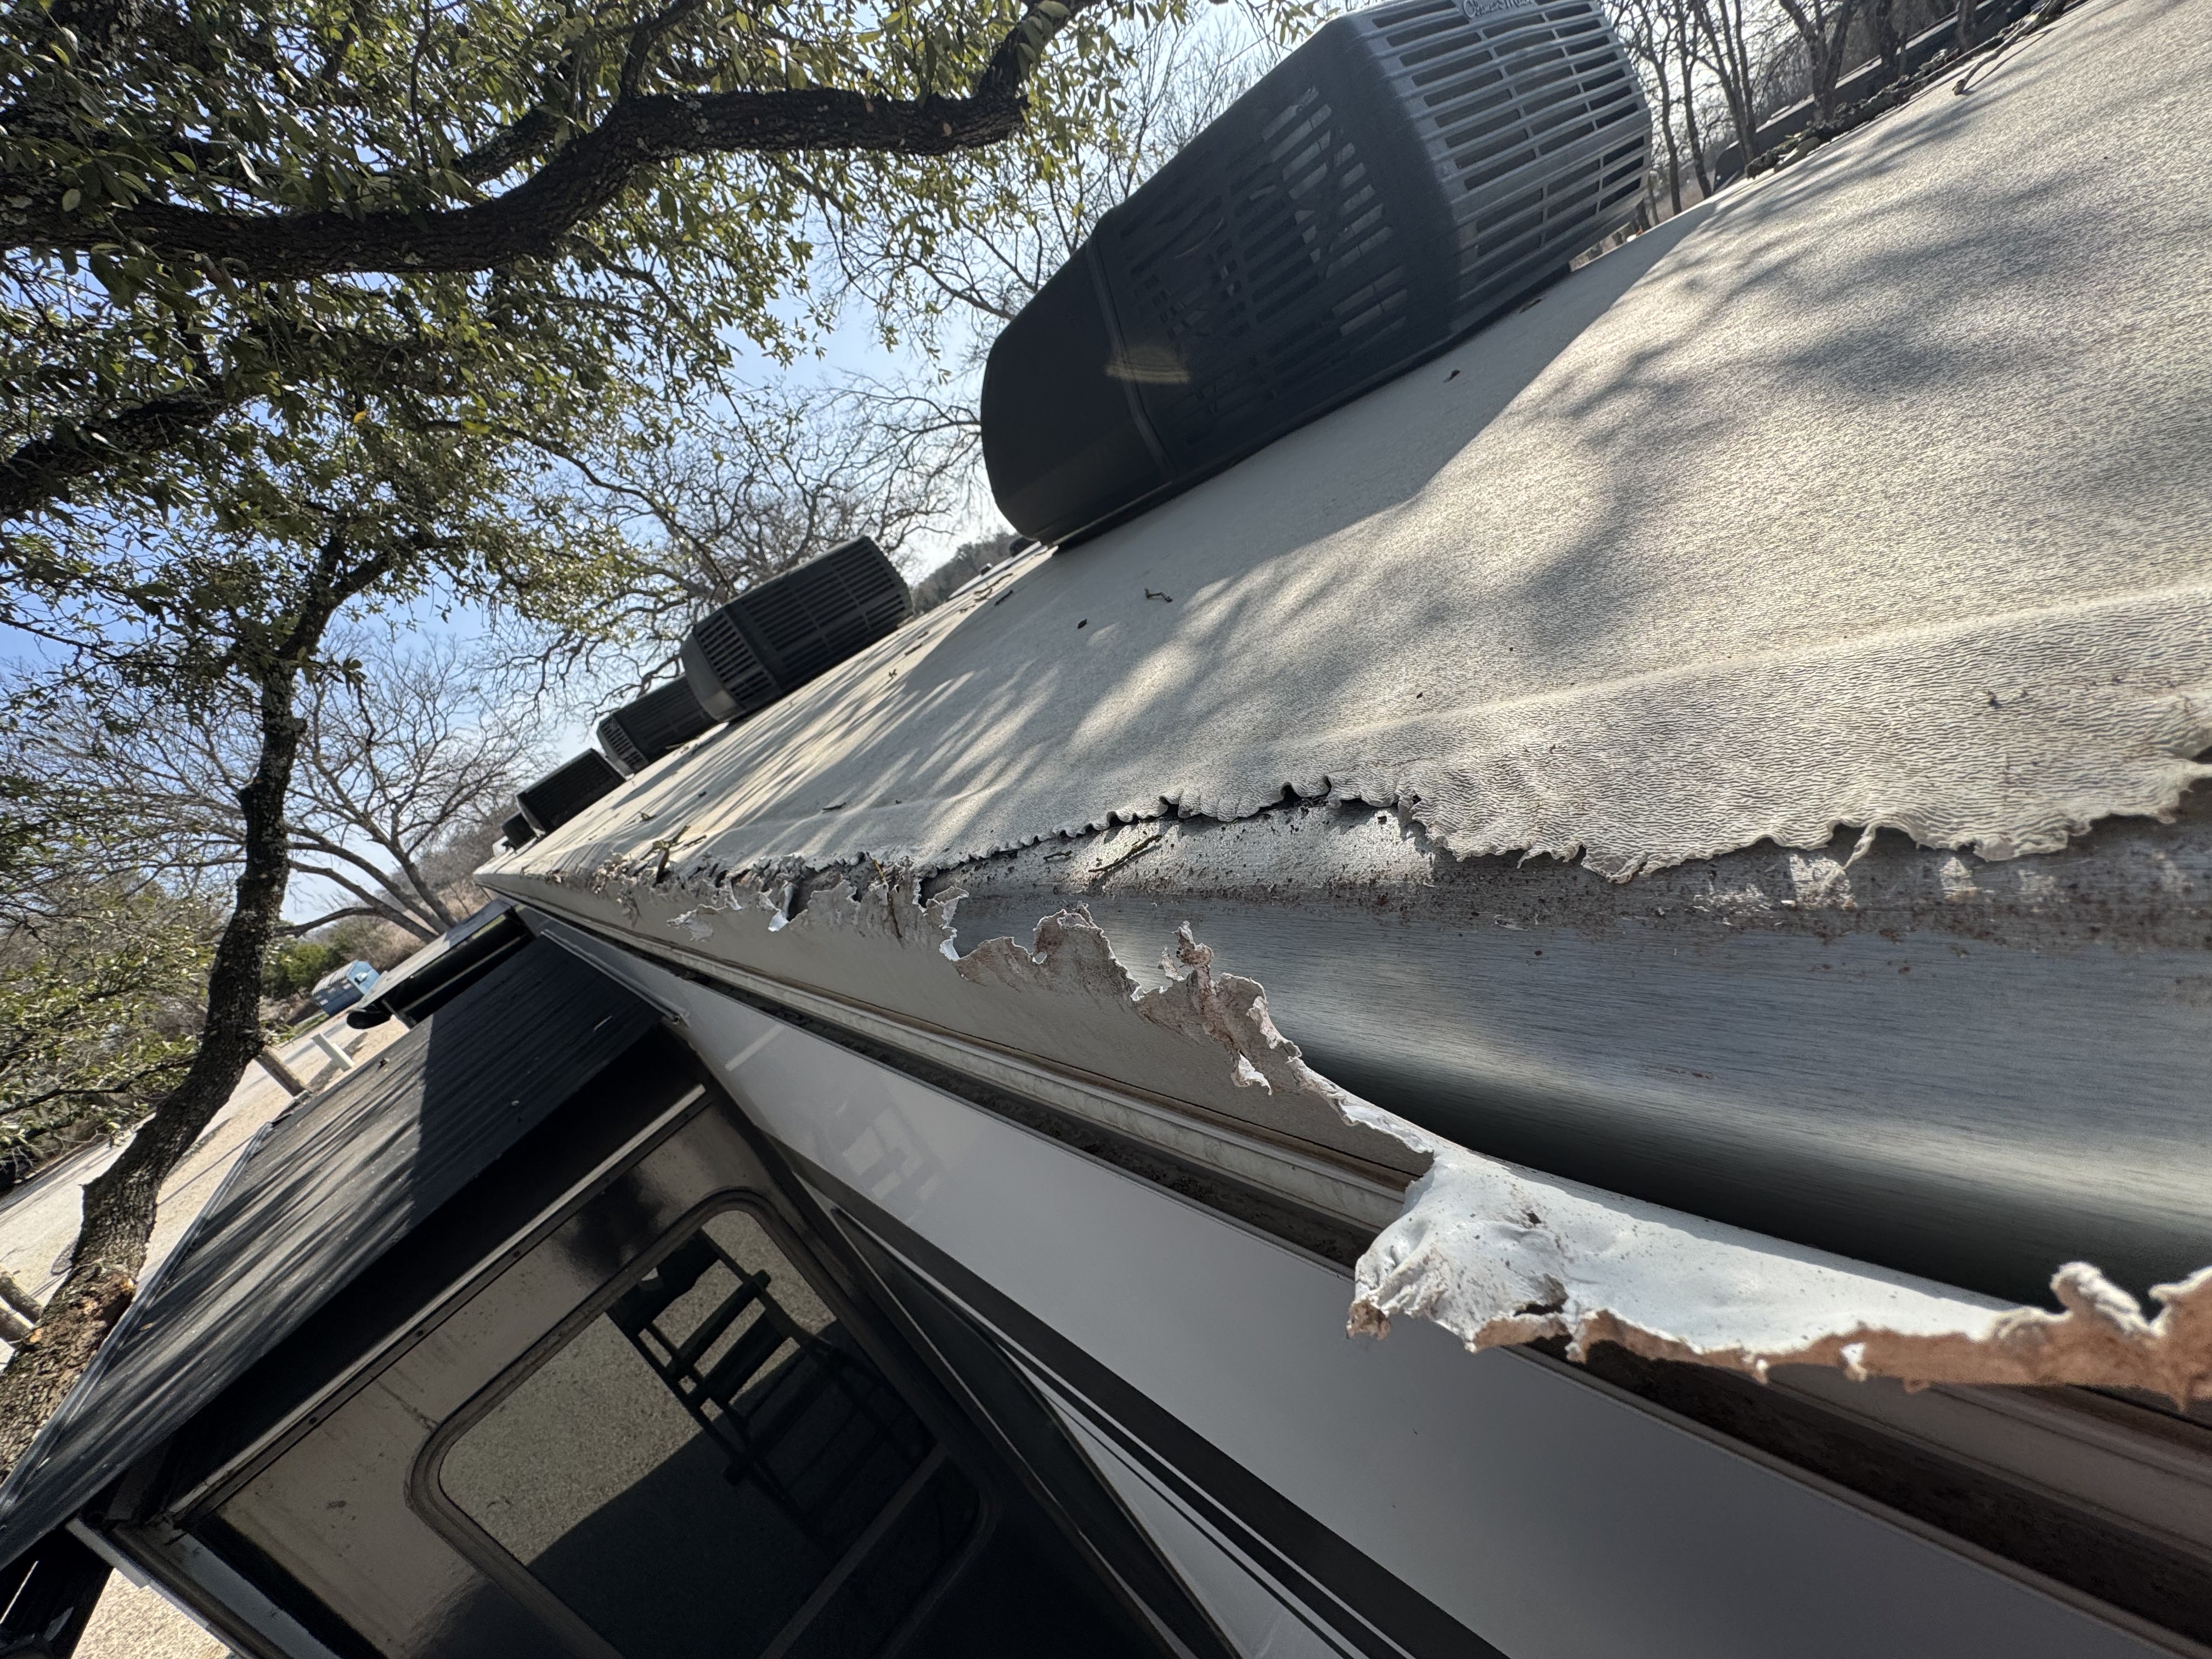
Full-length membrane separation documented along the drip rail. When the membrane loses adhesion at the termination rail the entire edge becomes an open water intrusion path along the full length of the affected side.
This type of full-length edge separation is not patchable with lap sealant. The membrane has pulled free from the rail and cannot be reseated. A membrane replacement or full Crazy Seal system installation is the correct repair path at this stage.
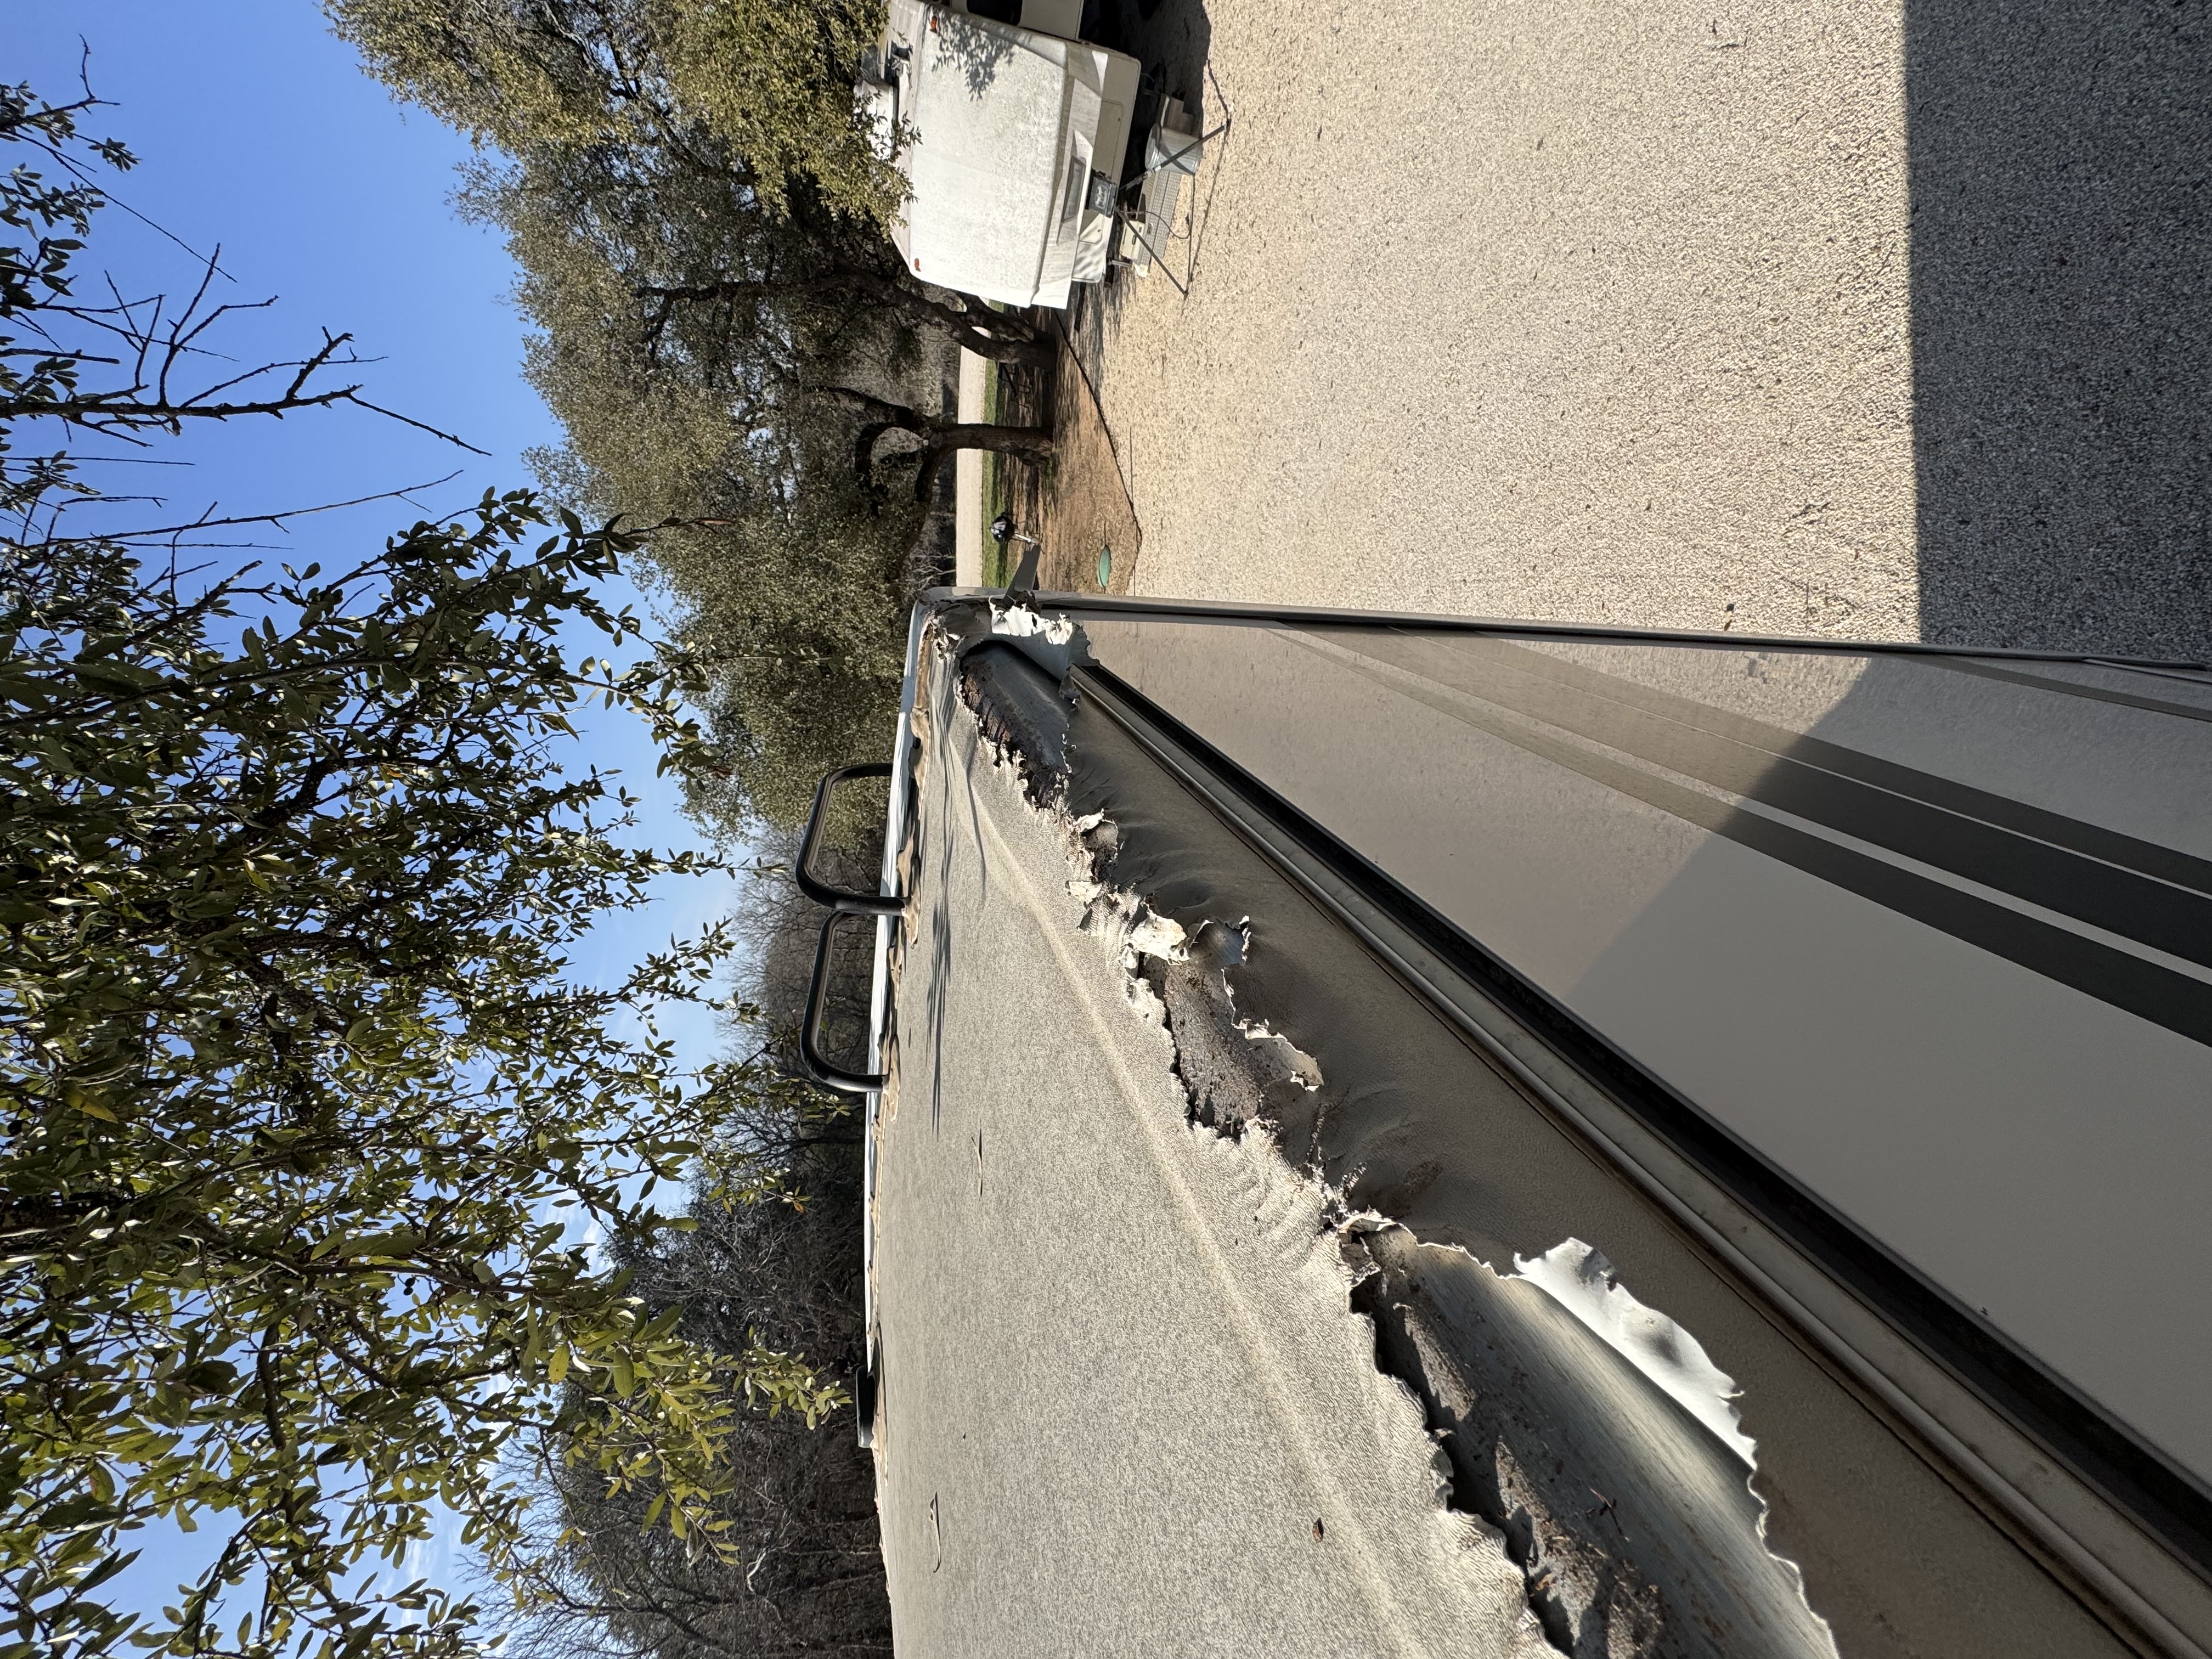
Rubber roof membrane peeling away from the drip rail at a campsite. Delamination of this type allows water to enter along the entire affected edge during any rain event — the condition was not visible from ground level until a roof-level inspection was performed.
The membrane was separating along the full visible edge. The owner had not noticed the failure because it was not yet visible from the near-side wall from ground. This type of failure is found on roof-level inspection and would have continued to allow water in until addressed.
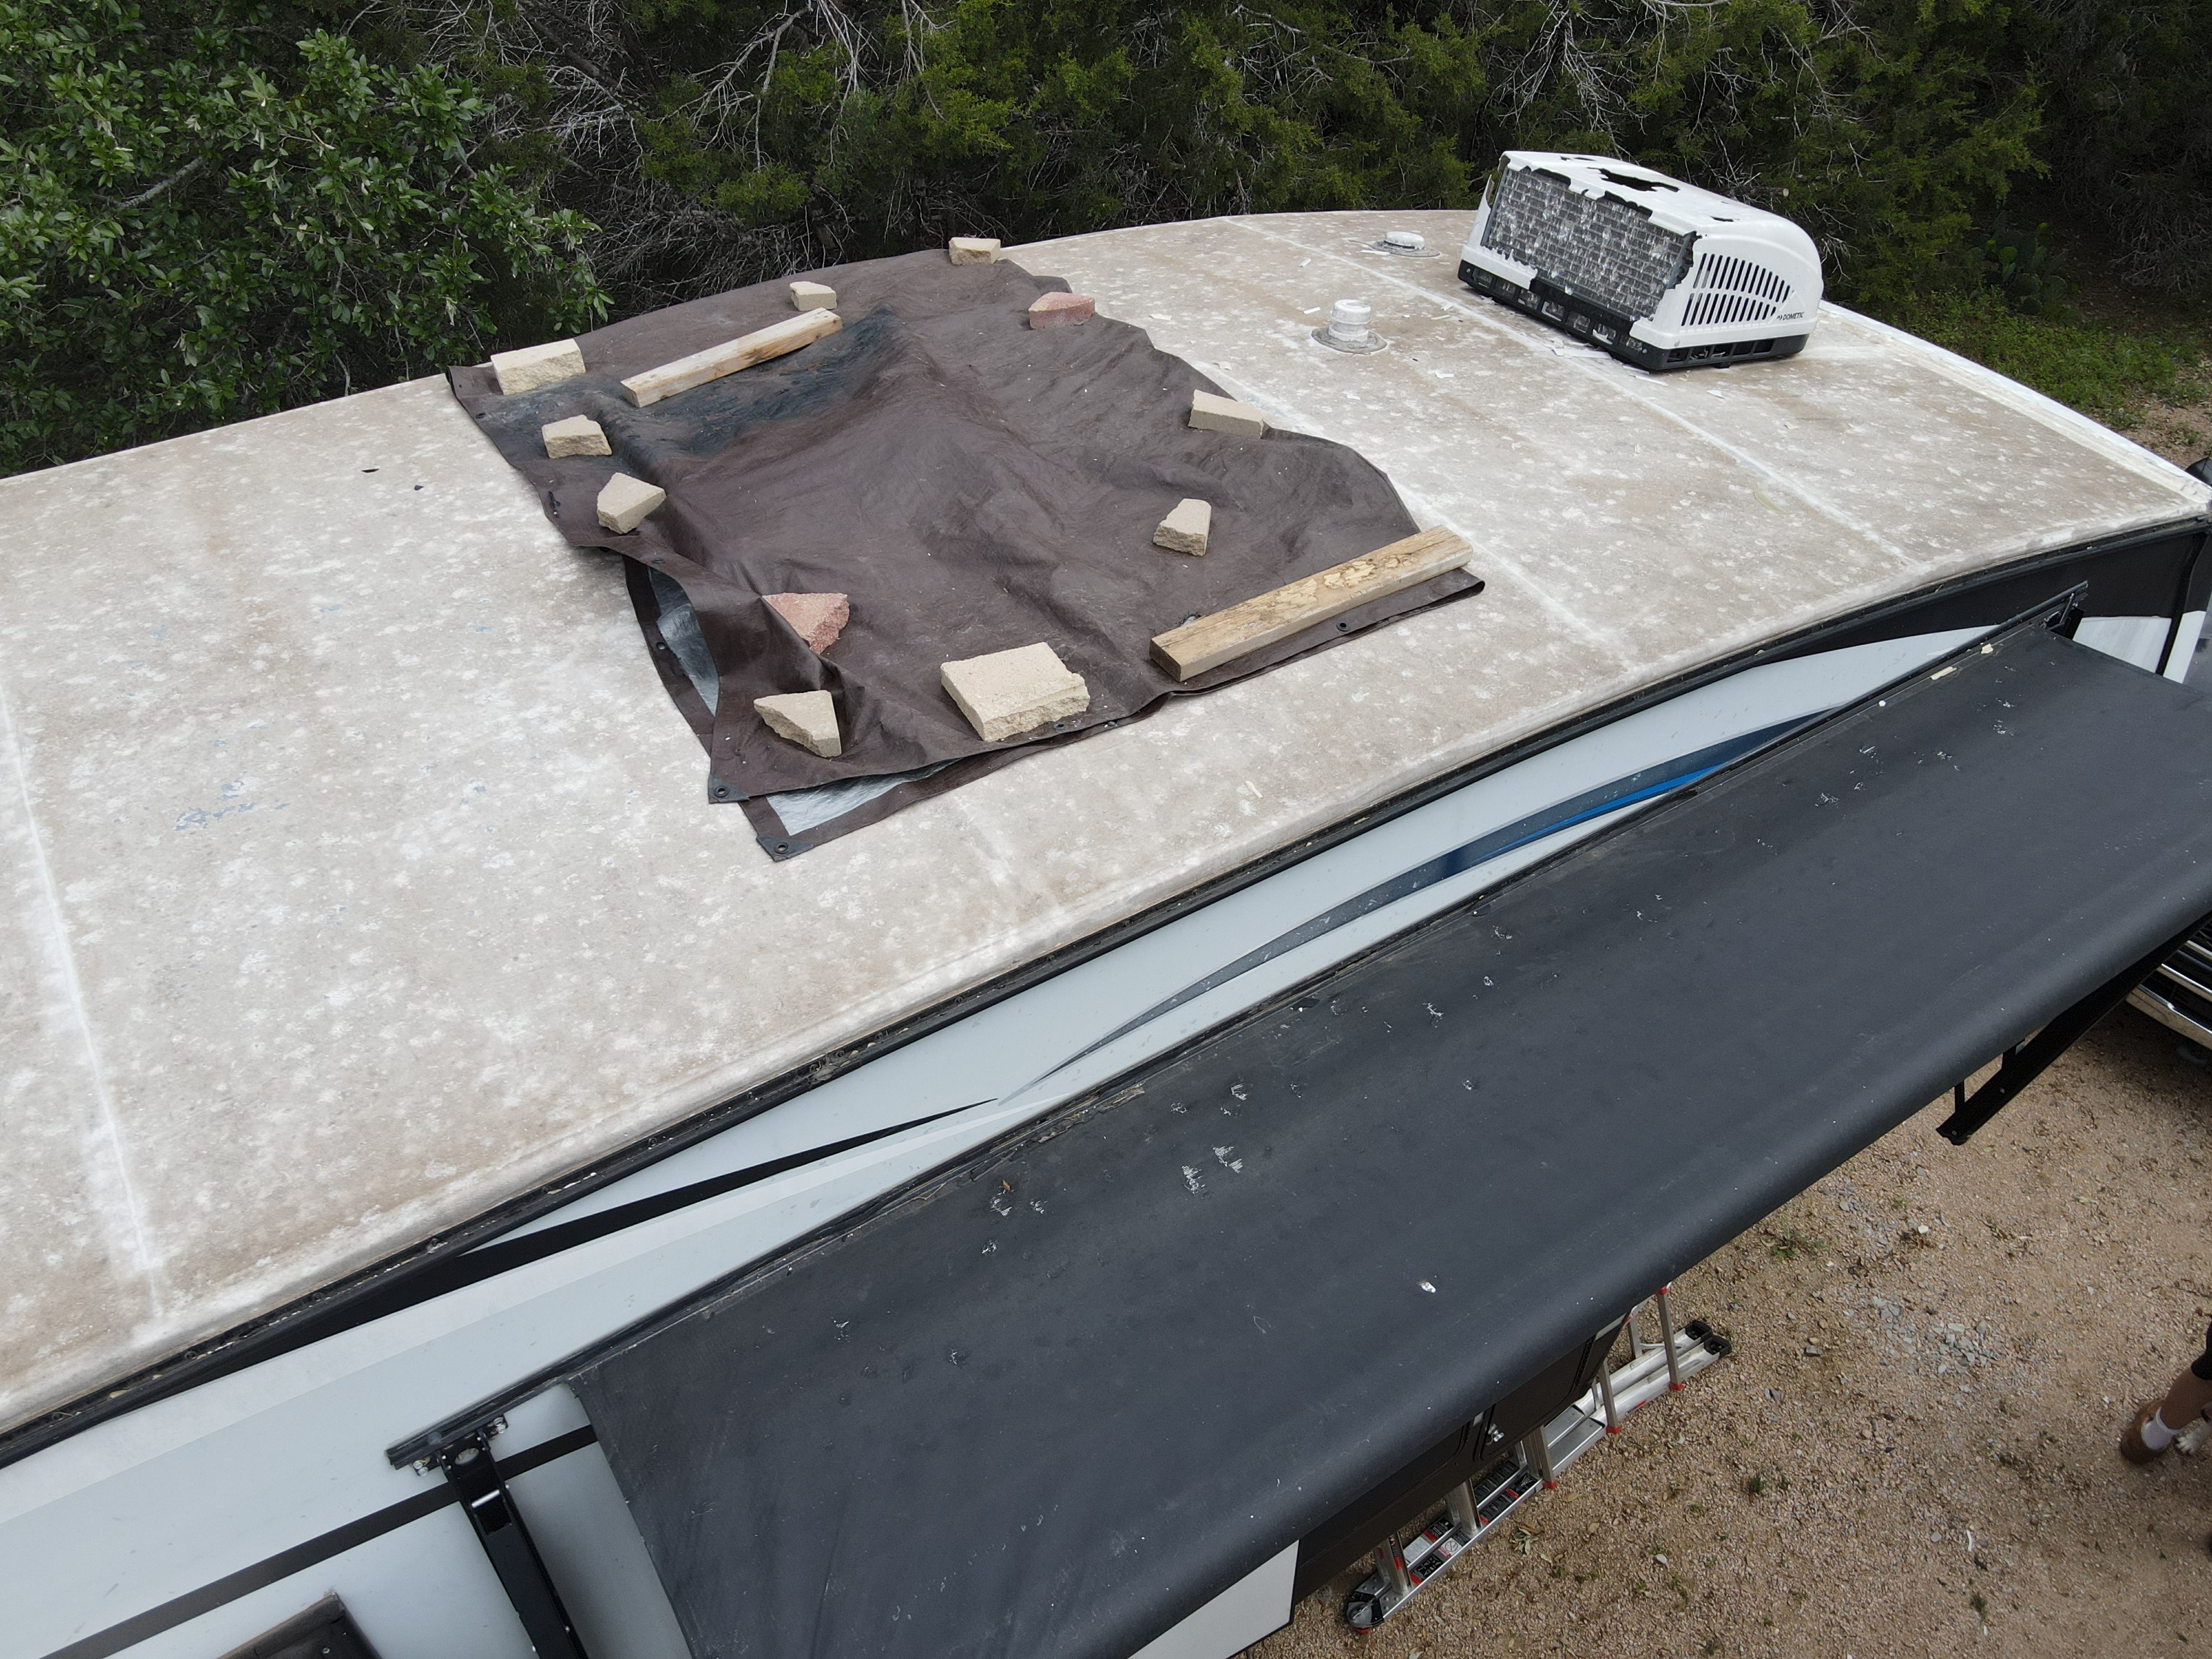
Emergency roof tarp installed in the field. A dark brown tarp is weighted with rocks and lumber boards to protect a damaged section of the roof membrane until a permanent repair can be scheduled.
The tarp was staged on the roof and secured with available weight to prevent water intrusion during rain events. This type of emergency protection is used when permanent repair scheduling requires a delay.
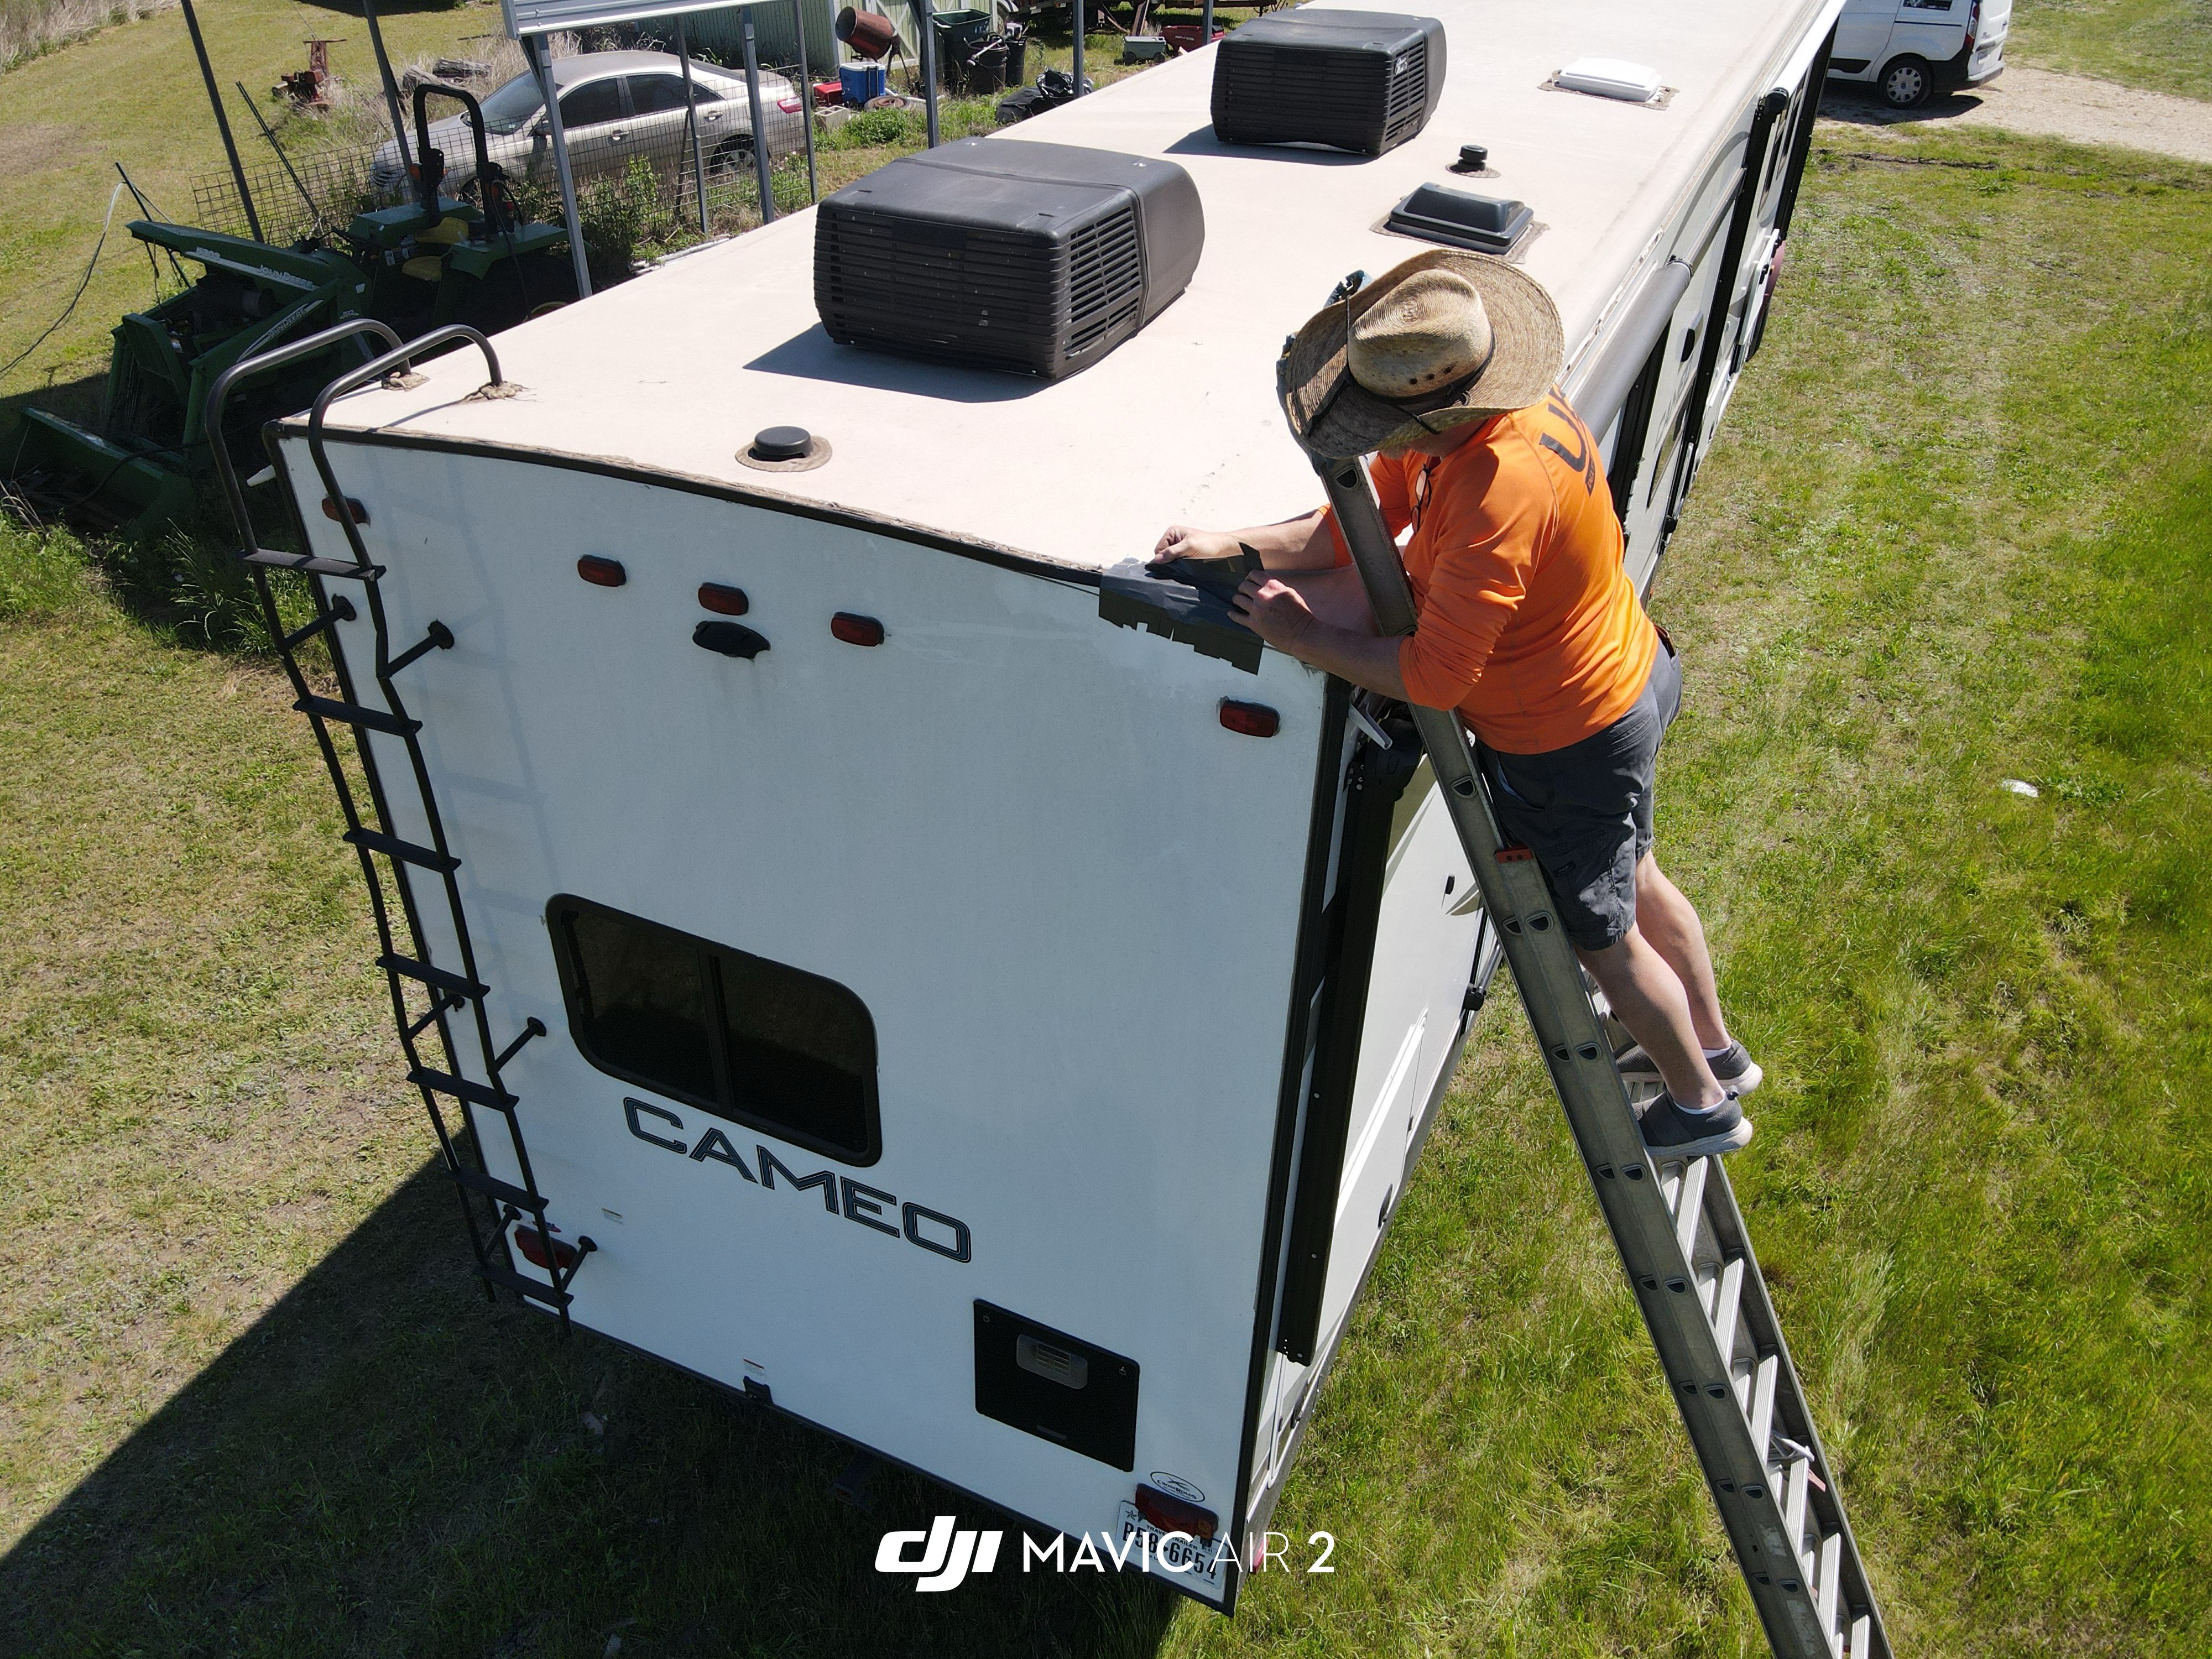
Overhead drone view of a rear cap seam repair in progress. The technician is clearly visible on the ladder working the sealant into the roof-to-rear-cap transition seam — the most common water entry point on fifth-wheel units.
The overhead drone angle documents both the technician's position on the ladder and the exact seam location being worked. The rear cap-to-roof transition was the confirmed leak source. The area was cleaned, the old sealant was removed, and the seam was resealed with compatible lap sealant.
Side-angle drone view of the same rear cap seam repair. The technician works the transition seam at the top edge of the rear cap on a Crossroads Cameo fifth-wheel.
This angle was captured alongside the overhead drone shot to document both the job-site context and the seam repair location from multiple perspectives.
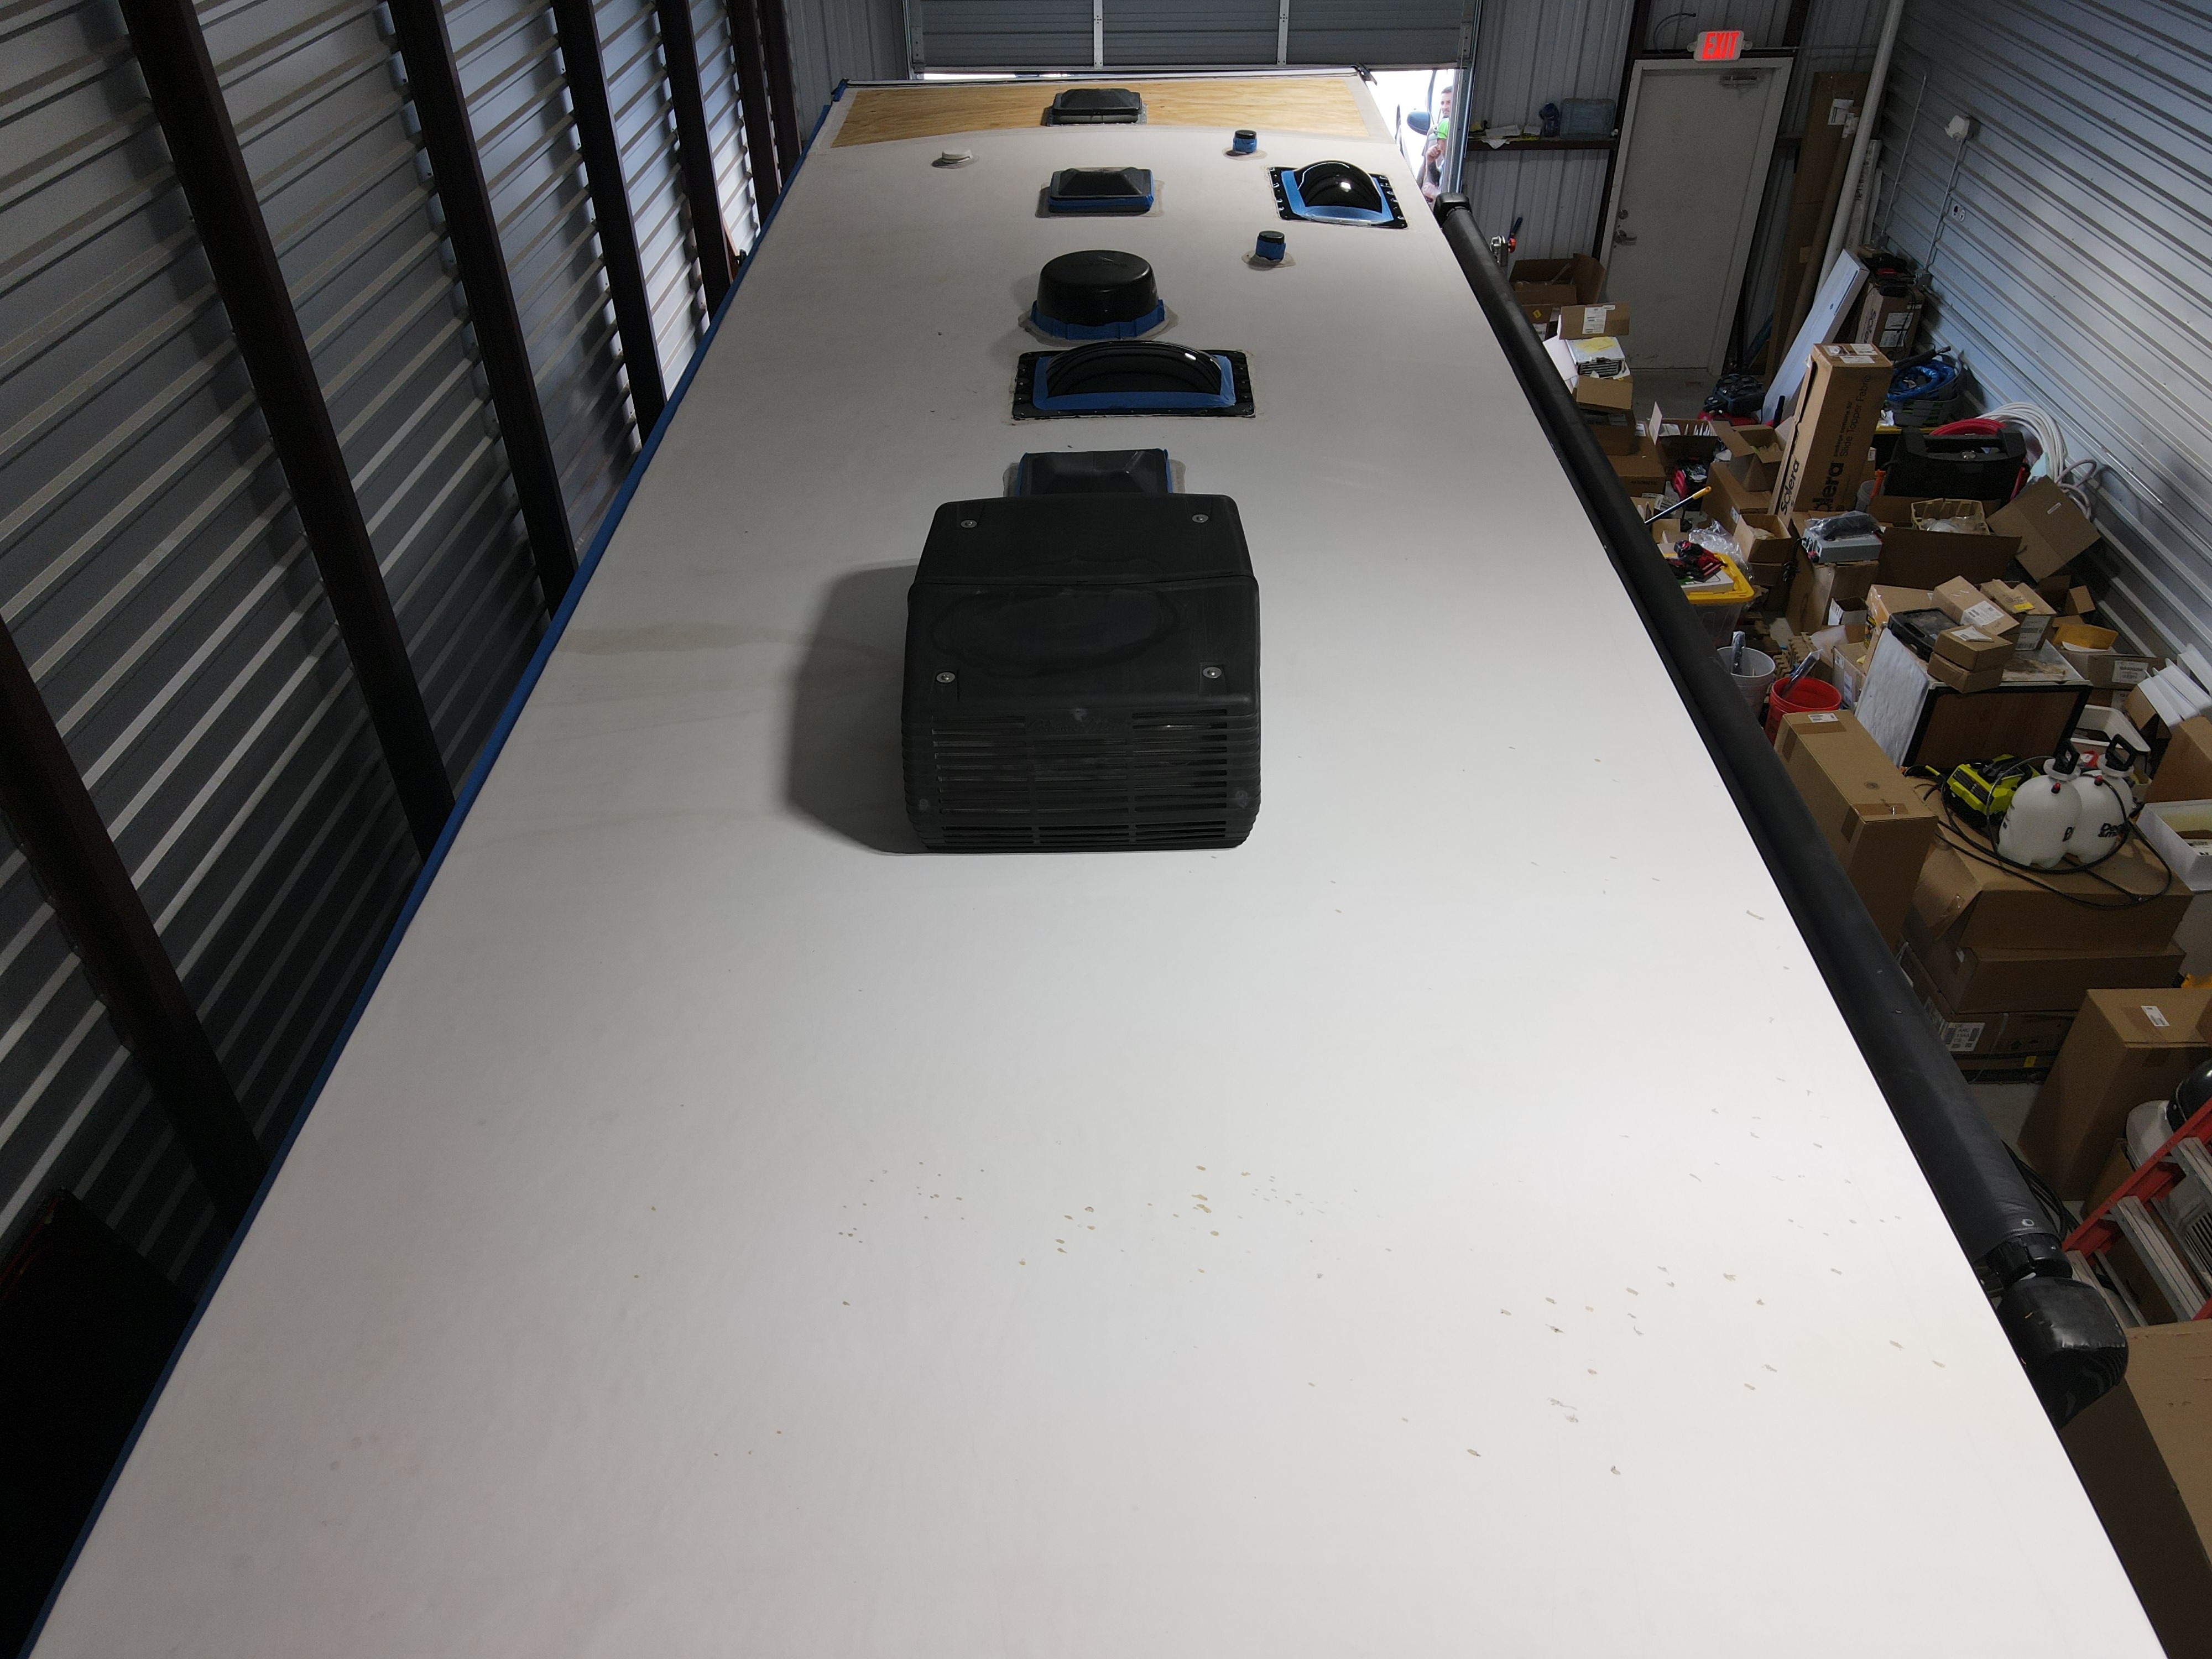
Complementary angle of the pre-coat prep stage — looking forward down the full roof length from the rear. All penetrations are masked and the fresh membrane is ready for coating.
This rear-facing angle was captured alongside the front-facing prep shot to document the complete roof surface and all penetration locations before the coating application began.

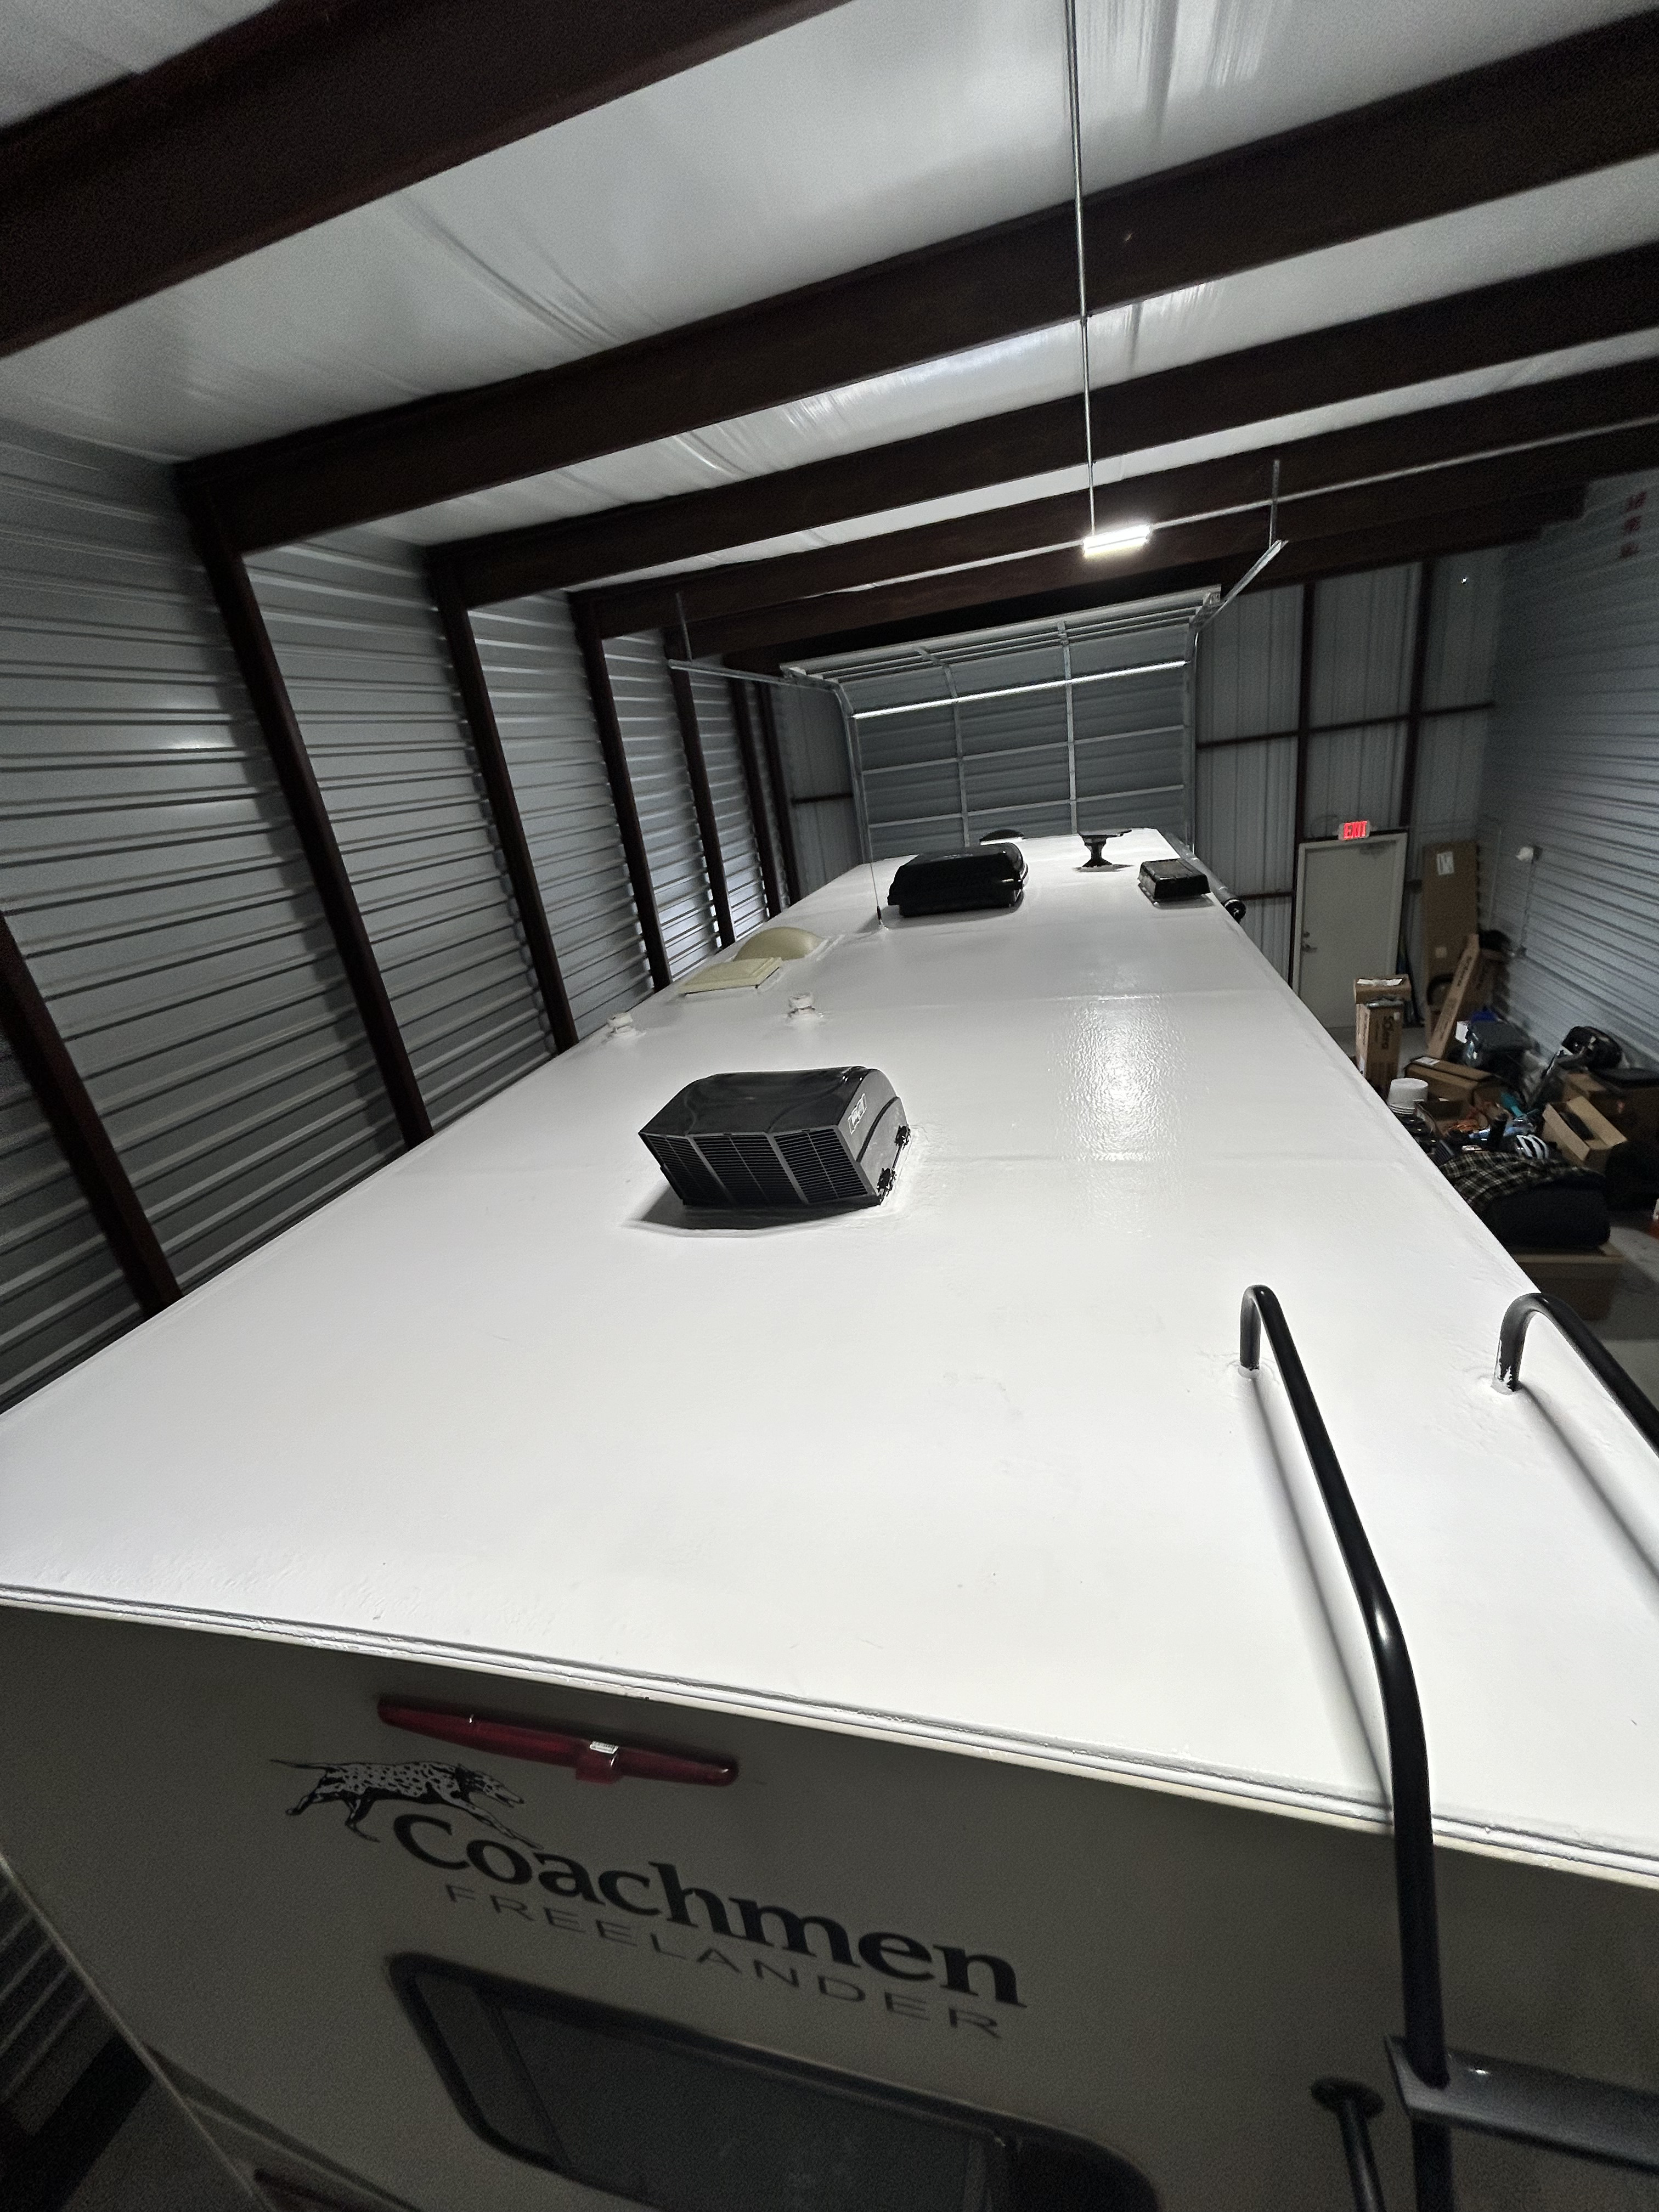
Completed elastomeric coat on a Coachmen Freelander, documented from overhead in the shop. The cured white surface shows full field coverage and tight penetration seals from this close-overhead angle.
This Coachmen documentation provides a different unit and angle from the Cameo restoration shots. Both show the same finished-coat standard — uniform coverage, sealed penetrations, and a clean surface ready to return to service.
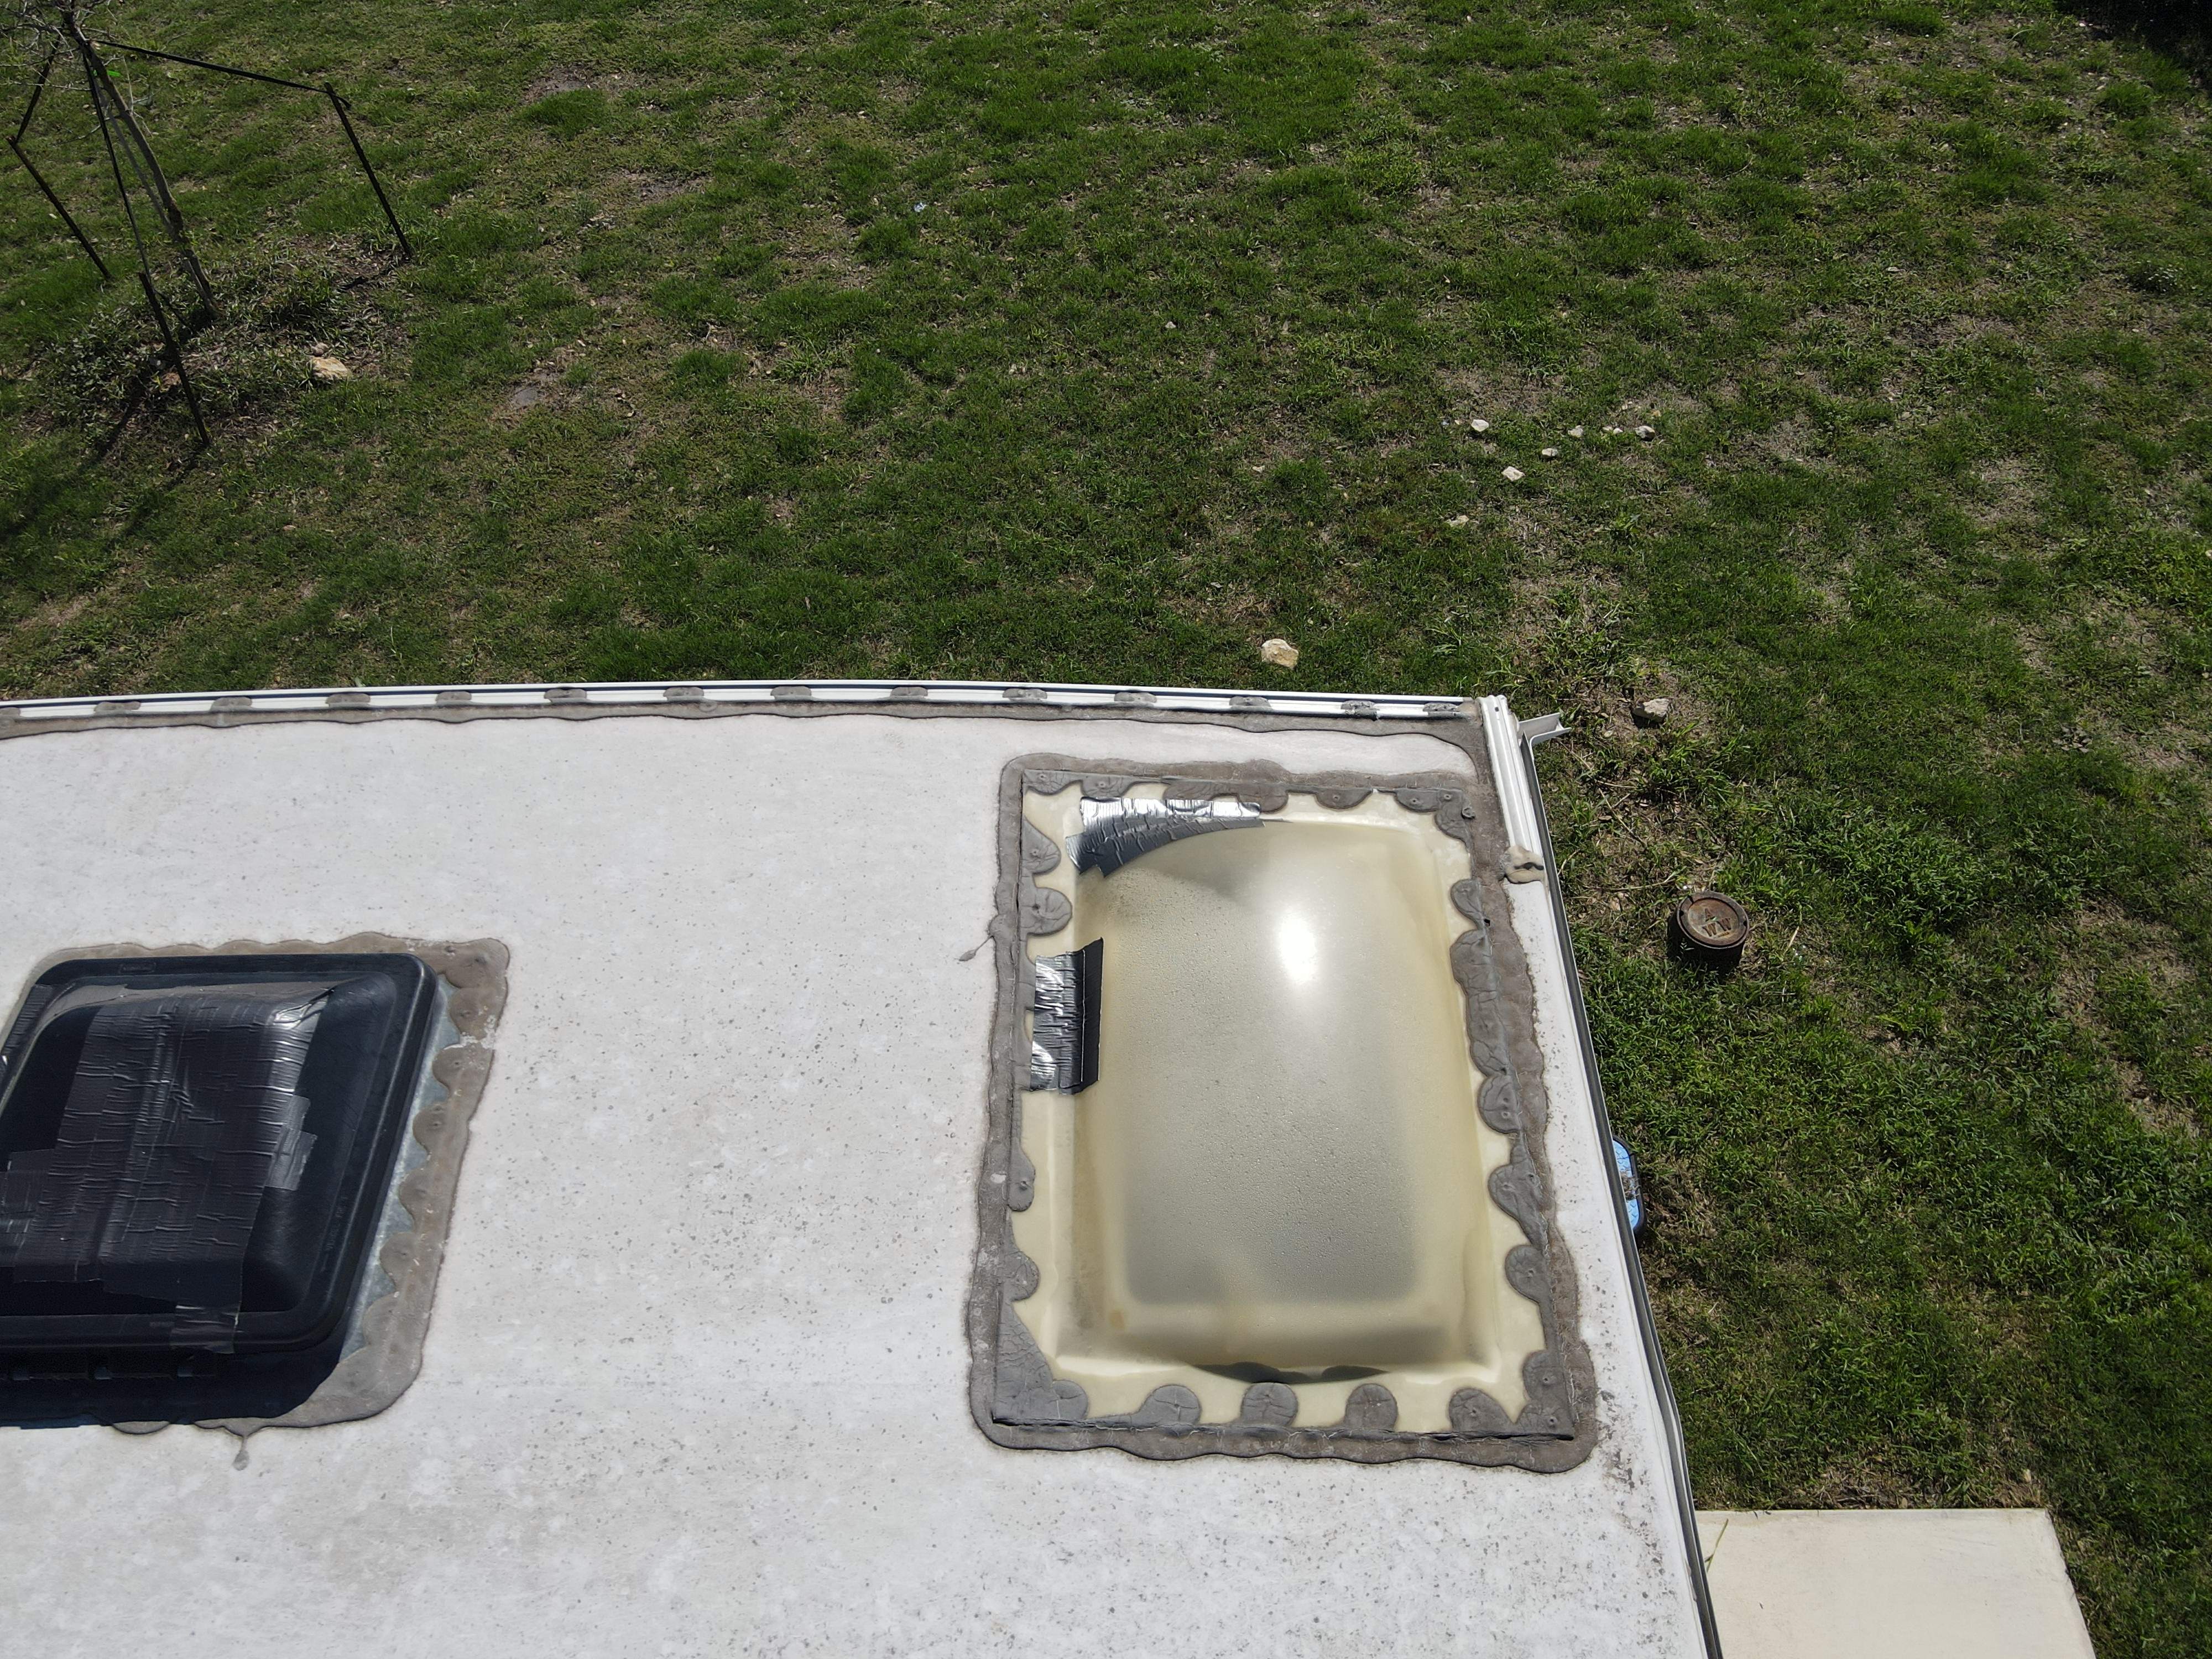
Pre-repair roof corner condition showing a yellowed, UV-degraded skylight dome with duct tape patching and a failed DIY sealant bead around the frame. Both penetrations show signs of previous repair attempts that did not resolve the underlying issue.
The skylight dome showed crazing, a duct tape patch applied over an open section, and irregular blob sealant around the entire frame — consistent with multiple DIY repair attempts. This level of deferred maintenance typically means water has been entering for an extended period before the service visit.
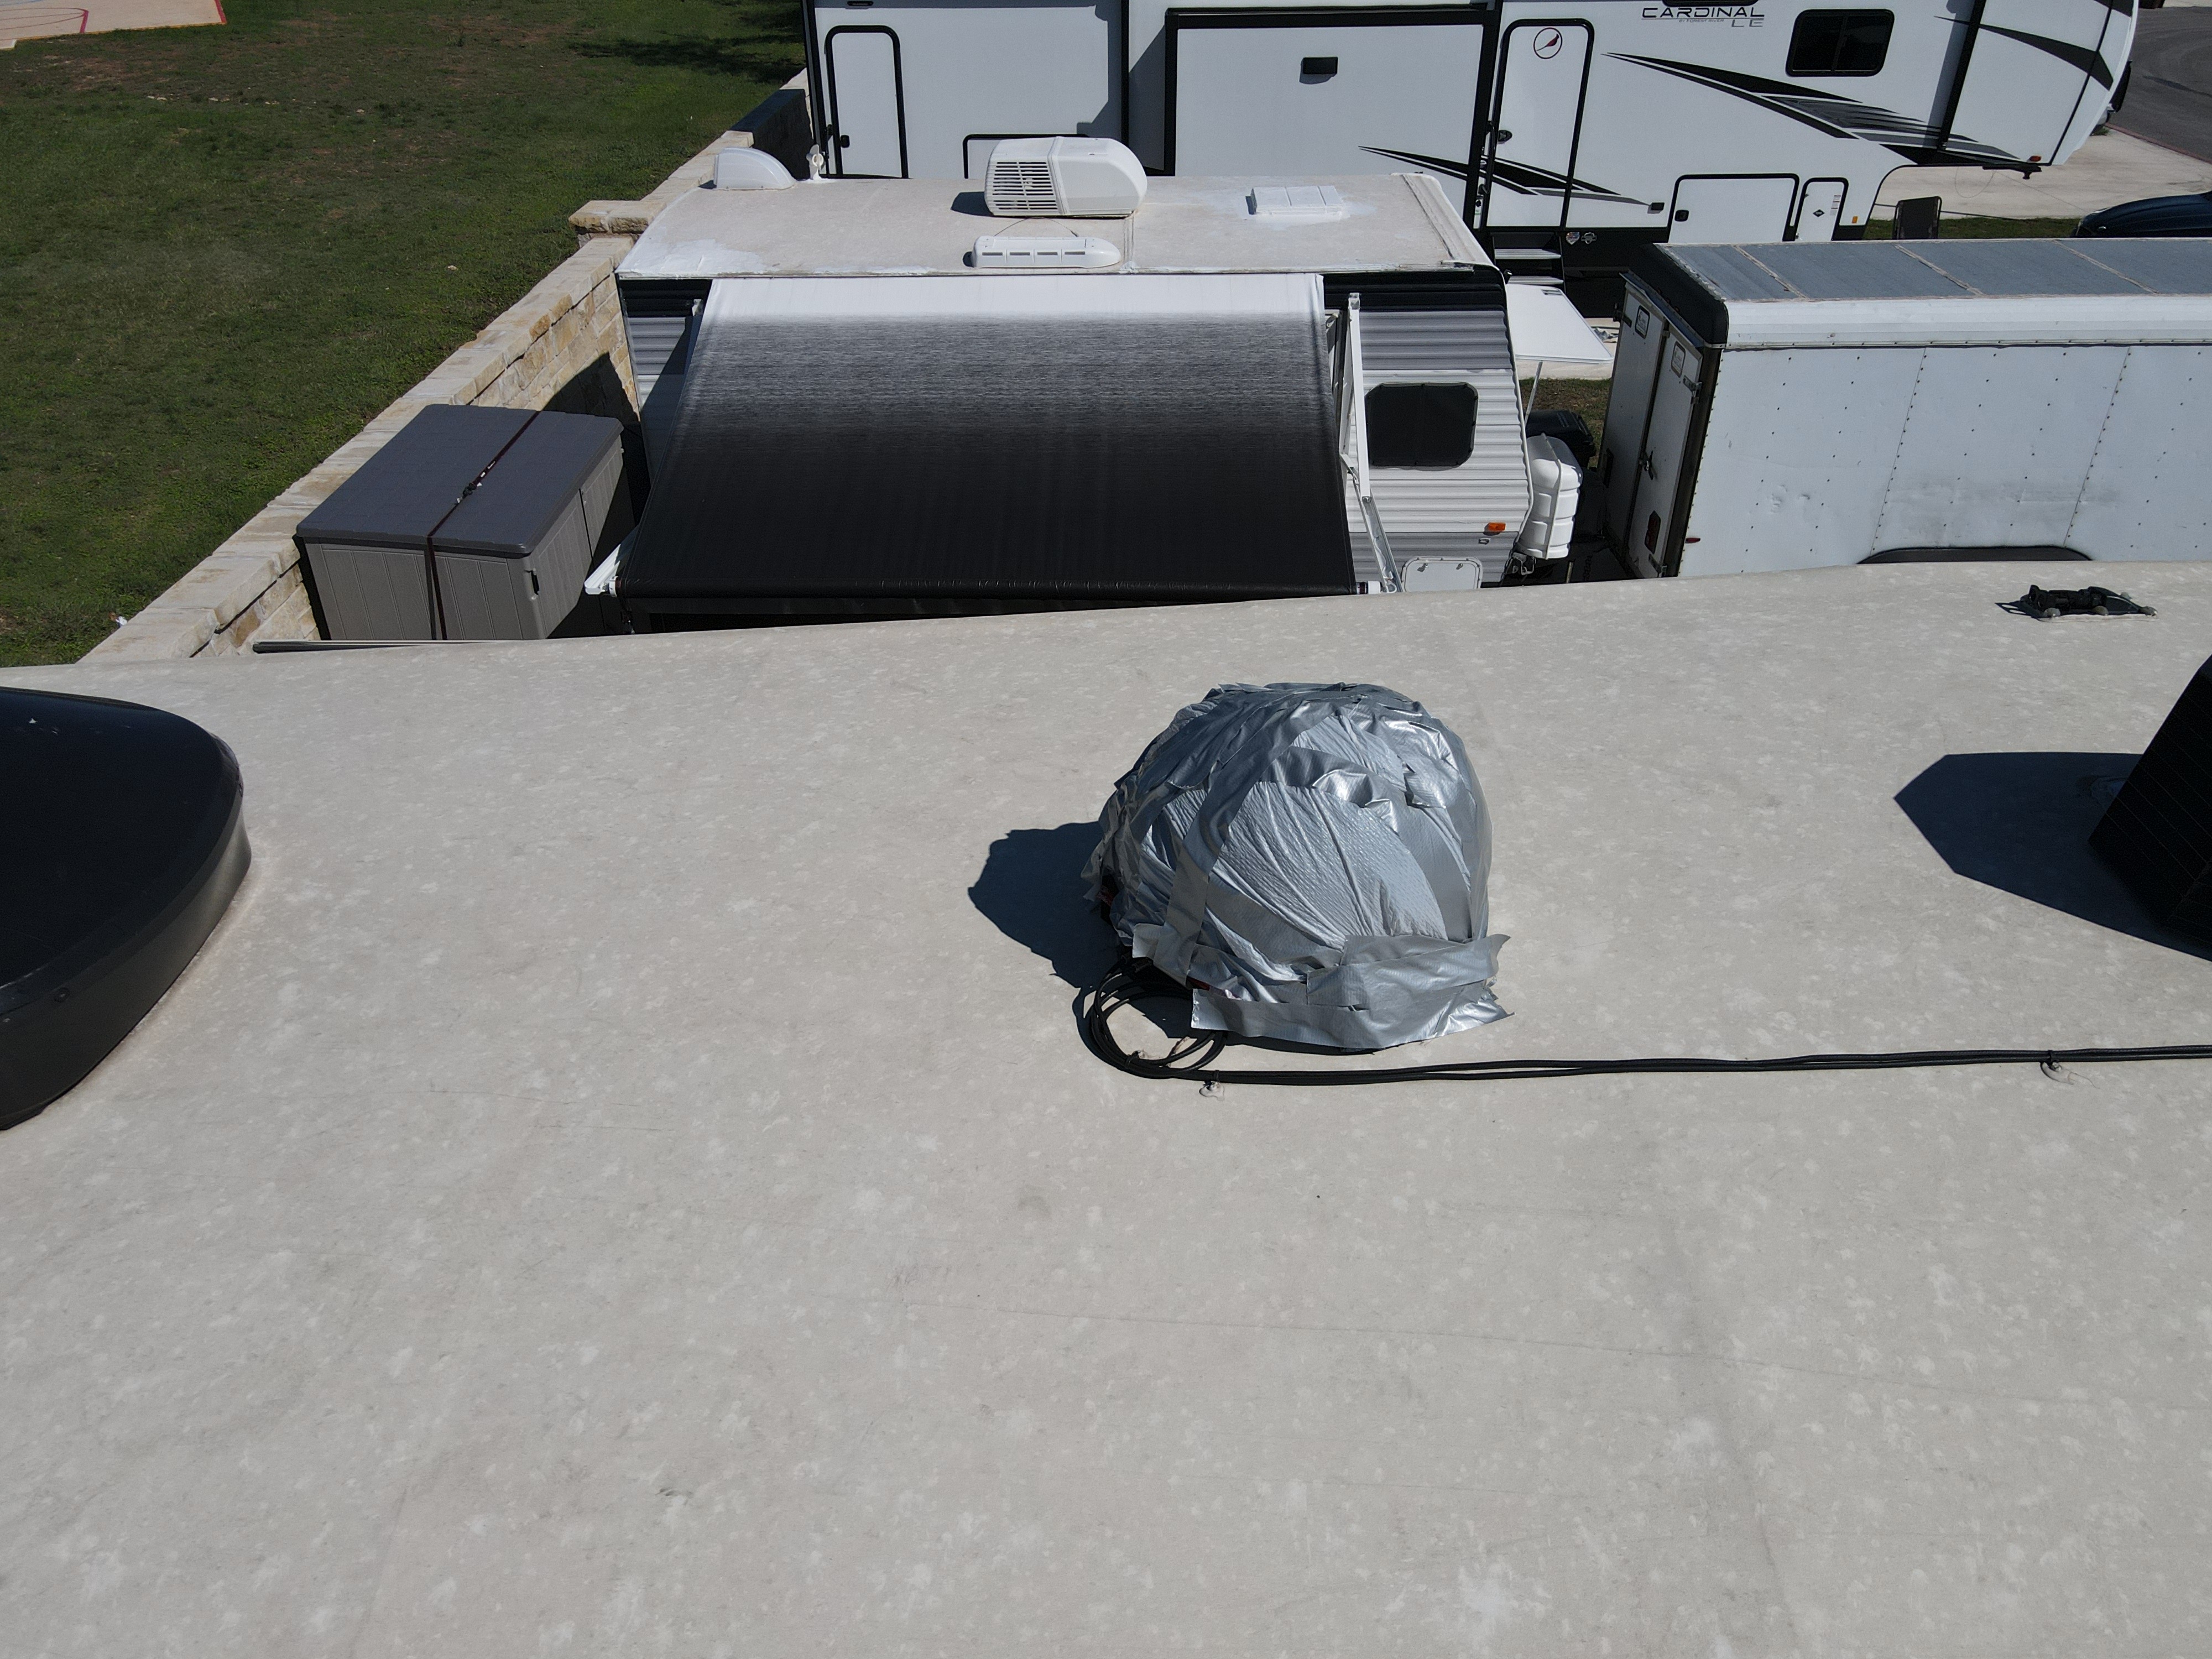
Satellite dome entirely covered in duct tape to conceal hail impact damage. The tape encapsulation is consistent with owner-applied storm protection. A full assessment of the underlying dome and mount condition is required before repair.
The satellite dome was completely encapsulated in silver duct tape, which is a common owner response to hail impact damage on roof-mounted accessories. The tape was documented before removal to capture the pre-repair condition for insurance and claim purposes.
Related Services
Brands We Service
Service Areas
Frequently Asked Questions
What Our Customers Say
“After the recent hailstorm this May and softball size hail, our roof did not incur any damage! Cannot say enough good things about this company!”
“Rich provided my hail damage repair parts/service estimate thru my insurance company. He has a great reputation thru Foremost Insurance and they trust his word/estimates.”
“Boss Bull replaced our roof coating and awning fabrics after the big hail storm last spring. They were very helpful with the insurance claim and did the repair quickly and professionally.”
Ready to get your RV back in service?
Schedule mobile RV repair across Central Texas, or call and talk to a tech now.